Reviews, updates and in depth guides to your favourite mobile games - AppGamer.com
|
Tutorials
Creating a water drop effect
Oct 18th 2005
|
Water Droplet Effect:
|
 |
1.
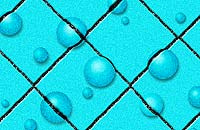
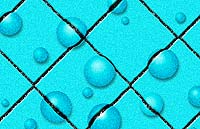
This method of creating drops of water can be applied to just about any photo or graphic. I made this beveled wall tile
pattern for another tutorial. Here we're going to learn one way to distort sections of the image so it resembles drops
of water on the surface. I've already made several "water drops" as you can see. We're going to work on one for that empty spot in the lower middle portion. |
|

|
2.
Using the elliptical marquee tool  (with the Shift Key held down), I start by drawing a circle selection over the area I want the droplet to be. I copy and paste the selection so the work we do will be on layers above the original image. (with the Shift Key held down), I start by drawing a circle selection over the area I want the droplet to be. I copy and paste the selection so the work we do will be on layers above the original image. |
|
|
|
|
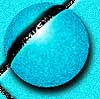
3.
The 3-D effect that will go a long way toward giving us a realistic water drop shape comes courtesy of Spherize, one of the Distort Filters. How much you apply it will depend on what you think looks appropriate for your image. In this case, I applied it once at 100% strength. For some images, if you think it needs a little more of a bubbled look, simply re-apply the filter. Use the Amount slider to control how much distortion occurs.
 |

|
4.
Now I'm going to introduce the kinds of values we might expect to see on a three dimensional object of this type. Keeping the selection active, I create a new layer above our spherized effect and use the radial gradient tool  to create the sphere-like values you see to the left. To make it, I had the Foreground to Background option chosen in the Gradient Picker (white= foreground; black= background). I clicked where you see the highlight and dragged down to the right slightly. to create the sphere-like values you see to the left. To make it, I had the Foreground to Background option chosen in the Gradient Picker (white= foreground; black= background). I clicked where you see the highlight and dragged down to the right slightly.
The "look" of the value gradation will depend on what image you're trying to make this water drop effect on. For lighter images, like a sky or bright outdoors scene, a "dark" gradient like you see to the left will work fine. For darker images, drag a little farther before releasing the mouse when applying the gradient so there are more light values (and less black.) |

|
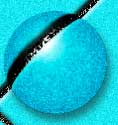
5.
To apply the gradient we just made to the Spherized layer below it, change the Layer Blending Mode (of the gradient) to Overlay. You can see the result.
Once you get the hang of the way the gradient tool needs to be handled, a way to skip this step would be to select Overlay as the blending mode for the Gradient tool when you use it. |
 |
6.
In the next step I wanted to darken the very edges of our drop, imitating realistic features I observed in actual drops of water. There's more than one way to do this, but since the layer styles are so handy and easy to apply, I chose Inner Glow. I clicked on the "glow" color and picked black. I chose Soft Light for the blend mode, and used 76% opacity. The result was a subtle darkening near the very edge of the water drop. |


|
7.
Last step: create a subtle shadow caused by our drop of water. Here's how I did it. With the circular selection active, I created yet another layer and filled it with black. Then I chose Filter: Blur: Gaussian Blur and used the slider to soften the edge of the "shadow."
After clicking OK, a large black dot obscured my view of my work so far. We'll have to move this layer. |
|
8.
I put the shadow layer below the other two,
moved it down and to the right slightly, then reduced its opacity to 40%. Here's what the layer's palette looked like when
I was done:
It could get pretty messy if you have three layers for every drop on the image. I suggest merging layer's together once you're done & happy with the result. Or, if you want to keep the option of reworking the individual layers open, 6.0's new feature of organizing layers into Layer Sets could help keep the palette from growing too long. |
 |
9.
I was reasonably pleased with the results of my efforts. The shapes I created look a great deal like drops of water. But I found no way of easily creating the complex sharp reflections I observed on actual drops of water. There'd be no formula for recreating that. It would simply require a lot of painting and that goes beyond the scope of a simple tutorial.
Here's another option: You can decide for yourself if this optional last step improves the look of the water drops on whatever image you're working with. I put a really sharp highlight on this drop

by customizing a brush (left) so I could paint a white diagonal oval shape easily. The result:
 |
 |
10.
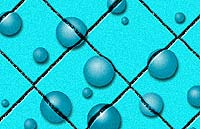
Well here's what my image looks like (sans sharp highlights). Don't think for a minute that I went through all the steps
above each time I wanted to create one "drop." I don't have that kind of time on my hands. I recorded two Actions to do most of the work for me. If you're interested, I drew a selection, then played one action that spherized and created a new layer. I had to apply the gradient manually, then I clicked the second action which performed steps 5-8 above. This way of working saved a lot of time. To learn how to record your own actions, read my tutorial, Recording your own Actions with the Actions Palette. |
| Here's another option:
|
11.
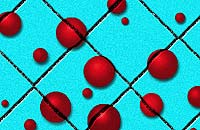
After I had grouped all the water drops together on one layer (Copy Merged is a great fast way to do that),
I used Hue/Saturation adjustments to change the tint of the droplets subtly (left) and drastically (below). Looks like
Norman Bates has been at work here:
 |
| I didn't get the chance to apply this effect to photographic images. Photos come with their own set of considerations, and while the results above look (reasonably) unquestionably like drops of water, the results with photos were sometimes strange and could be interpreted as something else entirely. But it's definitely worth trying. To see some of the cool results and for some added info on applying this effect to pictures, see the companion tutorial, Water Droplet Effect 2: Photos |
|
|
Latest Forums Clone YourselfThat is quit nice. But I think that can be more easy to do.. |
|
|
