Reviews, updates and in depth guides to your favourite mobile games - AppGamer.com
|
Tutorials
Diamond Tile Pattern
Oct 18th 2005
|
Diamond Tile Pattern:
|
 |
Making Good Tile
Hey, forget Home Depot! Next time you have to replace the bathroom tile, look no further than your nearest copy of Photoshop! In my tutorial Water Droplet Effect, I made it look much like drops of water were on everything in site. But how did I make that tile? Read on... |

 |
1.
Adding Noise to a Color
This is an easy one... but with a lot of illustrations. First we've got to make a square file & pick a color. My actual file was kind of big- 1" x 1" at 150 ppi. This step, along with many others, is arbitrary. When you make your own pattern, look for opportunities to add your own ideas. I chose kind of a teal color and so it didn't look too fake, added some noise. I chose Filter: Add Noise and used an amount of 3.85- yours will depend on the resolution of your image, and your tastes.
Notice I put this on a layer above the background. We're going to need its transparent capabilities later. |


 |
2.
Drawing Lines
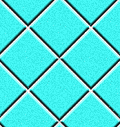
On a new layer, I next drew some lines from corner to corner using the pencil tool  .. An easy way to get 'em right is to click in one corner: .. An easy way to get 'em right is to click in one corner: Then position your tool precisely in the opposite corner, hold down the Shift key and click: Then position your tool precisely in the opposite corner, hold down the Shift key and click:  Presto! Instant straight line! This shift-click trick works with all the painting tools. See images to the left to see how it looked when I had both lines done. Here's another subjective choice. These lines will create a diamond tile shape. If you want a square, you could make horizontal & vertical lines. Presto! Instant straight line! This shift-click trick works with all the painting tools. See images to the left to see how it looked when I had both lines done. Here's another subjective choice. These lines will create a diamond tile shape. If you want a square, you could make horizontal & vertical lines. |
|
|
|


 |
3.
Changing the Line Color
I've led you down an unnecessary path with this step, but I thought I'd leave it in to show you a weird way to change value.
I had created the black lines for this tile that I used in the water droplet tutorial, but when I sat down to write this one I thought "black?" What is that stuff between the tiles called, anyway? Caulk? (Amazing- I know Photoshop like the back of my hand but so much general knowledge evades me) Anyway, I don't think I've ever seen that stuff in black before, but it seemed to look cool. So you can just choose your color before you draw the lines. I have to change mine.
To do that I chose Image: Adjust: Curves. It started out looking like the image at top left. I clicked on the lower left point and dragged up (you can also use the up-arrow key or Shift+Up-Arrow) until I had just the shade of light grey that I wanted. |

 |
4.
Using a Layer Style
Now I want to make it look like this caulk has a shadow fro the tiles on it. We could do this the old fashioned way or we could save time and use a Layer Style (that's Layer Effect for you pre 6.0-ers.) Let's save time.
I used Inner Shadow to create what you see. Play around with the settings until you get the angle, distance, & size you want.
|

 |
5.
Another Layer Style
Now we need to make that tile look 3-D. Start by loading the selection for our caulk-lines layer, then clicking on the solid color layer and hitting Clear or Delete. Now that area is transparent (see my Layers Palette image).
Next apply another Layer Style (Effect). This one's going to be Bevel and Emboss. Again, mess around with the sliders & dials until you get it how you want it to look. The controls are very user friendly and it's really going to depend on your image's resolution and color.
I got this great embossed look you see to the left. Is that cool or what? |


 |
6.
Cropping the Edge
One nasty side effect of the layer style was that the emboss was also applied to the outside edge of our file. See the bottom right corner: 
That's going to ruin the ability to tile this pattern later unless we get rid of it. First we've got to render the effect. Choose Layer: Layer Style: Create Layers and merge them together (or create a new layer above and merge down.) Now to crop off what I don't want. I start by moving out guides so I can draw an accurate marquee. Here's the upper right corner:

See the image at middle left to see what it looked like after I drew a marquee to crop out the pixels on the outer edge. Choose Image: Crop. At bottom left is what my file looked like afterward. |

 |
7.
Creating a Smooth
Tile
We're making a small pattern we'll use to fill a larger area later by tiling. We've got to know how the edges will line up and whether it looks seamless or not. Choose Filter: Other Offset and enter numbers in the offset boxes that represent half the pixel dimensions of your file. Check Wrap Around. Here's what I saw in the center:  The tile has just a little too much contrast where the corners meet up- it looked unnatural. I just needed to blur it a bit (I used the blur tool): The tile has just a little too much contrast where the corners meet up- it looked unnatural. I just needed to blur it a bit (I used the blur tool):  There, that's better. Now (see far left) everything looks convincing. There, that's better. Now (see far left) everything looks convincing. |

 |
8.
Using the Pattern
It's time to sit back & enjoy! We know the pattern will tile nicely since we checked it with the offset filter. Select: All & flatten the image or choose Edit :Copy Merged and paste the flat tile on a new layer. While everything is selected choose Edit: Define Pattern. If you've got version 6.0 or newer, you'll be able to give it a name and it will forevermore reside among your patterns.
Now create a larger file and choose Edit: Fill (with Pattern)
My little screen shot here doesn't do it enough justice. It really looks great. Now go do that tiling job you've been putting off. (If you're from www.bathrooms_r_us.com, feel free to use my file as your HTML background with my blessing.) |
|
|
Latest Forums Clone YourselfThat is quit nice. But I think that can be more easy to do.. |
|
|
