 |
1.
Get Crafty
Right off the top, let me say that I have no experience whatsoever at creating Stained Glass Art. I have experience with many mediums, but the closest I come here is that I once had a friend whose mother made stained glass. This is by way of saying that no doubt many of you will notice errors when I attempt to label the technical aspects of this "craft."
But that's okay! You don't have to know how to make stained glass to join in the fun with me here. Everything we'll do will take place within the color space of your monitor, in a little program called Adobe Photoshop. And by the time we're done you'll be able to simulate stained glass artwork in a way that will impress your friends and anger your enemies. Let's go! |
|
2.
Choose Your Artwork
Most of the time, when I write a tutorial, it's designed to give you lots of choices, so that nobody's results will look like anyone else's. Time for your first choice: What would you like the subject matter of your stained glass window to be?
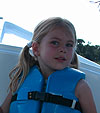
I chose a photograph of a darling little girl who bears a remarkable resemblance to my daughter and went on from there. But you could choose an existing piece of clip art; make your own graphic; scan in a drawing- there are many possibilities. In order to proceed, all you really need is a black outline of your subject matter.
In the image at lower left, I've created a layer above the image of the seafaring girl and drawn an outline above the photo of what I wanted to use in the stained glass. You probably should keep it reasonably simple- too much detail will be hard to deal with later on.
I used a five pixel tip on the pencil tool to create my black outline. The tool and size you choose will depend on the resolution of your image. I thought I wanted a really crisp, hard edged line, but soon you'll see I probably should have used a seven or eight pixel paintbrush. Oh well. |
|
|
|
|
3.
(not really a step)
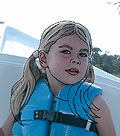
Here you can see how my outline stand up next to the photo, as well as which areas I embellished upon (it's hard to find the perfect photo.)
In the image at the immediate left, I thickened and smoothed the outline a bit. I didn't like the jagged quality of my pencil tool outline, so I Command/ Control - clicked the outline layer to load a selection of it, then used commands in the Select Menu to expand and smooth the selection. I still wasn't seeing quite what I wanted so I chose Filter: Blur: Gaussian Blur and smoothed the outline a little further. All of this won't be necessary for the rest of the lines I'm going to draw, because I'll use a soft-edged paintbrush. (just thought you'd like to know.) |
|
4.
Pick A Color
Man, I can't wait to get to the part where we make the stained glass-effect. But first we'll need some color in one of the areas of the drawing. I started with the skin, so I clicked on my foreground color to bring up the Color Picker and chose a light flesh-like color (R=255; G= 212; B= 183) and got ready to fill the face.
To select the area, I used the Magic Wand Tool  and made sure it was set to Use All Layers. (I had previously filled a new layer beneath the outline with white, so I wouldn't be distracted by the photograph.) I clicked with the wand inside the face area of the outline and selected all the skin. Before filling I chose Select: Modify: Expand and enlarged the selection a couple of pixels. Next I created a New Layer below my black outline. Then I pressed Alt/Option-Delete and filled with my peachy hue. and made sure it was set to Use All Layers. (I had previously filled a new layer beneath the outline with white, so I wouldn't be distracted by the photograph.) I clicked with the wand inside the face area of the outline and selected all the skin. Before filling I chose Select: Modify: Expand and enlarged the selection a couple of pixels. Next I created a New Layer below my black outline. Then I pressed Alt/Option-Delete and filled with my peachy hue. |
 |
5.
Textured Glass
Now for the fun. There's tons of ways to give this colored area the texture I wanted, but here's what I did: I chose Filter: Texture: Texturizer... and that brought up the dialog box you see to the left. Since my flesh color was on it's own layer, the effect I'm creating won't affect our outline or the white layer.

You can see I chose Sandstone from the pop-up Texture: menu and scaled it up to maximum and increased the Relief to 7.
It's best for you to play around with your own settings here. My file had a resolution of about 3 x 3.3 inches at 300 ppi (929 x 1007 pixels), but the effects you get will depend on how large your image is. |
|
6.
Glass-like Glass
The sandstone texture looks cool, and you could stop there; but after some thought I went to Filter: Distort: Glass... to further my glasslike effect on the flesh area.
You can see the Glass Dialog over there at left with the Distortion and Smoothness settings (among others) that I chose. Again, you just want to move the sliders and watch the preview until you get the effect you desire. |
 |
7.
Repeat
Now it's just a matter of choosing colors, filling areas, and giving them the texture you want.
To select the hair, I went back to the Wand Tool and this time had to hold down the Shift Key in order to select multiple areas at once. I made a layer for the hair, expanded the selection 2 pixels, chose a yellow color, and filled the selection. This time, when I used the Texturizer..., I chose Canvas instead of Sandstone. (I thought I'd better look at some actual Stained Glass Artwork if I was going to imitate it, and some of the pieces I saw used several different textures of glass for variety). In the image at left you can see I changed the settings slightly in the Glass dialog box.
|
 |
8.
Check It Out!
These small images aren't doing justice to the cool textures we're making so take a look at this close-up I shot after finishing off the rest of the shapes in the face.
Here's what it looked like so far:
 |
 |
9.
No Floating Heads
The main reason I belatedly examined some examples of actual stained glass artwork was because I wasn't sure what I'd do in the background.
In this image, you can see me imitating the sorts of shapes you might see in real stained glass pieces. I decided to add the rest of the visible body before tackling the background.
If you look close you'll see that some of the shapes in the shirt are selected. That's because I did the stained glass effect (steps 4-6) on the entire shirt all at once, then reselected some of the shapes and altered their color using the Colorize option in the Image: Adjustments: Hue/Saturation... command. This saved a good deal of time and I used the same step on the background. |
 |
10.
Background
Here's how it looked after I drew lines to break up the back ground. I'm using a 6-7 pixel paintbrush. Some of the lines are freehand, others are straight.
To easily make straight lines with any brush tool, click where you want to begin the line; then hold down the Shift Key and click again where you want the line to end. Instant straight line! |
 |
11.
More Glass...
I made all the glass in the background at once. Some of the glass I saw had a much smoother texture, and this seemed appropriate for the less-important background shapes. (continued below)
 |
 |
11 (continued).
I
started out using the Filter: Render: Clouds command (with white and gray as my colors). Then I chose Filter: Noise: Add Noise to give the clouds some texture. Next, I used the Motion Blur... from the Filter: Blur Menu and blurred the clouds diagonally. Finally, I used Filter: Distort: Ocean Ripple to imitated the pebbled texture of glass.
When I was done with all that, I reselected some of the shapes in the background and repeated the steps from the previous paragraph; making a few slight changes so the pieces didn't look to similar. At left, you can see how it looked without my outline layer visible. |
 |
12.
More Coloring
Here you can see how the "sky" looked after I colored those shapes. Just like In step 9, I colored all the shapes at once using Image: Adjustments: Hue/Saturation... (with Colorize checked), then used the Magic Wand, to reselect some of the shapes, and re-Colorized them. That didn't take a lot of time and gave me a good deal of variety.
Note: every time I wanted to select individual shapes with the Wand, I had to turn off (make invisible) the layer with the stained glass on it. Unless only your black outline layer is visible, you'll have a hard time selecting whole shapes. |
 |
13.
All Done?
Here's how the image looked after I was done coloring the background using the techniques I described in step 12 above. You can see here how I organized the many layers in my Layers Palette by grouping them in Layer Sets. One for the Head, one for the Background. The folder for the latter is open:
 |
 |
14.
A Stolen Border
I whipped up this neat border using....
Okay, I confess. I just popped in a Clip-Art Disc, and chose a frame I wanted to use; then copied, pasted, and scaled it properly. Then I used the (by now) familiar techniques from steps 4-6 and step 9 to color all the shapes in.
Hey, I was too tired to draw my own frame, alright? I mean, there's no need to re-invent the wheel here! |
 |
15.
Get The Lead Out
Hey, were not done yet! Unless I'm mistaken, those black lines dividing the pieces of glass are made of lead, and they have a three dimensional quality to them that we can easy imitate using Layer Styles. Choose Layer: Layer Style: Bevel and Emboss... (or use the icon at the bottom of the Layers Palette) and play with the settings until you lines look convincingly curved.
That's it! We've done it again. Check out this detail of the upper right:
 |
