Tutorials
Underwater effect on a photo
Oct 18th 2005
|
Underwater Effect on a Photo:
|

|
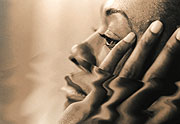
1.
I'm Drowning Here...
I was in the doctor's waiting room a few months ago looking at one of those ladies magazines where you can check out beautiful scantily clad women (I haven't figured out why ladies would want to see this, but no complaints here). Anyway, these magazines are about 90% advertisements and ever since a 2-D design class I had made me buy Vogue or something, I've enjoyed examining the cutting-edge designs you can see in some of the ads. I saw an ad for some perfume, and it showed a couple embracing as they were completely submerged in the amber liquid. The use of my old friend Photoshop was much in evidence, and I cautiously ripped out the page and stuffed it in my pocket, with an idea for doing a tutorial on this.
Which leads us to the present. I'm going to try and show you an easy way to create a similar effect. "Easy" is the key word here. The ad I saw used a similar technique, I'm sure, but probably took hours longer than what I'll do here. |

|
2.
Paths of Glory...
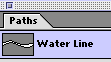
So I'm going to show you how to create an effect whereby you can make a photograph look much as if it's partially submerged in liquid.
To begin with, I'm going to establish the area which defines the top of the water level. To do this I use the bezier pen tool  to draw a stylized, curving water line. You can see to the left there how I named the path once I was finished. to draw a stylized, curving water line. You can see to the left there how I named the path once I was finished. |
|
|
|
|
3.
Select & Duplicate
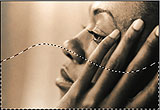
Now I'm going to select and duplicate the area of the photo which I want to look distorted, as if it's under the water. On the bottom of my Paths Palette, I clicked the Loads paths as a selection button  then used the keyboard equivalent of Select: Inverse to select the opposite of the path I drew (the bottom and top of the image around my path.) then used the keyboard equivalent of Select: Inverse to select the opposite of the path I drew (the bottom and top of the image around my path.)
Since I only needed the bottom part selected I used the freehand lasso tool  , held down Alt/Option and drew around the top to deselect it. Now it looked like the image you see at left, with just the bottom part selected. I quickly used the keyboard shortcuts for Copy and Paste, thereby duplicating that "submerged" portion and putting it on another layer: , held down Alt/Option and drew around the top to deselect it. Now it looked like the image you see at left, with just the bottom part selected. I quickly used the keyboard shortcuts for Copy and Paste, thereby duplicating that "submerged" portion and putting it on another layer:
 |
|
4.
Distort
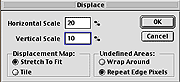
I'm going to create the underwater distortion now. The key to this is using the Distort: Displace... filter. For the entire story on the fine mechanics of this effect, check out my tutorial, Using Displacement Maps To Distort An Image, and its exciting sequel, More Fun with Displacement Maps.
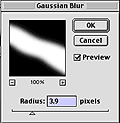
But the short explanation is that you use one image to distort another. Choose Filter: Distort: Displace... and you'll see the dialog box at top left. There you can control the quantity and direction of the distortion as well as how the second image (the displacement map) will be used, and what happens to the pixels near the edge of your first image. You can see the settings I used.
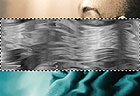
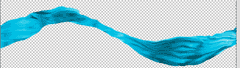
To distort the underwater portion of the woman's face, I created a second image. Using the pen tool I quickly drew wave-like shapes and filled them with black. It looked like this:
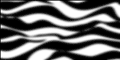
Once I clicked OK in the Displace Dialog, I got another dialog box where I had to navigate to this second image and choose it as the displacement map. You can see the results at left.
|
|
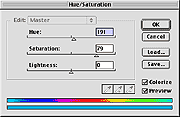
5.
Color My World
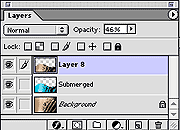
Next, I wanted to color this region. I chose Image: Adjust: Hue/Saturation... and checked the Colorize option. Then I messed around with the Hue (color) and Saturation (intensity) sliders until I had the monochrome I thought I wanted. I made note of my settings, because I would use them later at the water line, but after some consideration, decided to mute the intense aqua hue (see left) a little. I had made a duplicate of this layer before coloring, and I now placed that one on top and lowered its Opacity to 46% using the slider on the Layers Palette. You'll see how it looked below.
 |

|
6.
Cloudy Water
Now it was time to create the area which represented the water line. First, I drew a rectangular marquee around the middle portion of the image. Then, I made a new layer and chose Filter: Render: Clouds. If Black and White are your Foreground and Background Colors, you'll get something like I did in the image at bottom left. Keeping the selection active, I repeated exactly what I did in step 4 above, using the Distort: Displace... filter. To increase the effect I applied the filter twice and here's how it looked:
 |
|
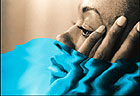
7.
Get Perspective
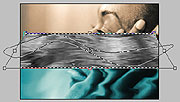
Well, its starting to look very water-like now, but I have to get it to fit within that area I defined way back in step 2. First I chose Edit: Transform: Scale, and Edit: Transform: Perspective to make the image look as you see at top left.
Notice in that image, that my Water Line Path is active. This has no effect on my transformation, but I wanted to be able to see it while scaling the distorted cloud area. With the transformation complete, I clicked the Loads paths as a selection button on the bottom of the Paths Palette and chose Select: Inverse to select the area outside of the path. Then I hit the Delete/Clear key to remove all of the distorted cloud image which fell outside the path.
All that was left was to colorize the waterline area now. I used the same settings as in step 5 above when I used Image: Adjust: Hue/Saturation... to make it look like you see in the lower image at left. This is the image you saw in step 1, and it looks pretty good, but I'm not quite done yet. |
 |
8.
Liquify
I' going to add a little more 'realistic' detail to the edges of the wave/water-line, using the Photoshop 6.0 or later command, Liquify. This acts like a combination of many of the Distort Filters, but you're able to apply distortions selectively using paintbrush-like tools.
I used the Warp Tool  for all my work, controlling its size and pressure with the sliders under Tool Options on the right side of the Liquify Dialog. for all my work, controlling its size and pressure with the sliders under Tool Options on the right side of the Liquify Dialog.
It's hard to see in these tiny images, but I was mostly working on the edge of the 'wave.' In step 7, when I cleared the area outside my path, the wave was left with crisp, hard edges, and in some places, the 'water effect' was abruptly cut off. I used the warp brush to push, nudge, and stretch the pixels near the edges, until they looked a little more believable and water-like. |

 |
9.
Mask & Blur
To help my wave blend in just a little with it's surrounding area, created a Layer Mask. To do this, click the Add a mask icon  at the bottom of the Layers Palette. Your layer should look like the one at top left. Then I clicked on the mask icon (the black & white one to the right of the layer icon) and choose Filter: Blur: Gaussian Blur... to blur the edges of the wave image enough to blend in just more convincingly. at the bottom of the Layers Palette. Your layer should look like the one at top left. Then I clicked on the mask icon (the black & white one to the right of the layer icon) and choose Filter: Blur: Gaussian Blur... to blur the edges of the wave image enough to blend in just more convincingly.
Note that thin black outline around the mask's icon in the top left image. This lets you know any work you do (such as when I applied the blur) will affect the mask and not the photographic image. The image is still exactly as it was after step 8, it's just had its sharp edges masked off a little. |
 |
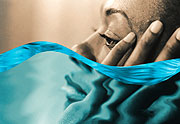
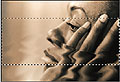
10.
Really Drowning...
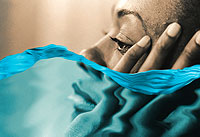
Well, that does it! You can see a miniature version of the finished image at left. For having no photo references, and creating all the liquid with filters, it looks pretty good. That distortion on the woman's hand is particularly impressive.
If you try this and find that after all the distortion, your waterline, and the below water areas don't quite match up on their edges any more, just used the clone stamp tool to fill in any gaps. I had to do this in one small area. |

|
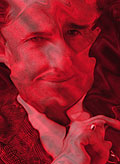
Bonus:1. More Distorting
On the image I saw in the magazine, the two people who were under water were only distorted in certain areas. Important portions of the image, such as the faces of the people were undistorted, so I wanted to show you way to do this.
It's very simple and to do it, we get to use the History Brush  . .
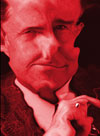
To begin, I picked the image of the guy and distorted and colorized the entire image using the same techniques as in steps 4 & 5 above. You can see that my displacement map nicely distorted most of the image, but did quite a number on his nose. |
 |
Bonus:2. History
To restore that ugly portion of my image I chose the History Brush and specified a point in history to paint from by clicking the box to the left of my Hue/Saturation state  in my History Palette. In the palette you'll see your most recent steps listed in chronological order. I clicked next to the one when I had just colorized the guy, but before I had distorted him. Then I simply 'painted' back in those areas that I wished to look clearer. You can see changes to the mouth, nose, and left eye. in my History Palette. In the palette you'll see your most recent steps listed in chronological order. I clicked next to the one when I had just colorized the guy, but before I had distorted him. Then I simply 'painted' back in those areas that I wished to look clearer. You can see changes to the mouth, nose, and left eye. |
|
Bonus:3. Another Layer
To complete the effect, I made a new layer at the top, and filled it with clouds, then distorted and colorized them similar to what I did for the water line in steps 6 & 7.
Next, I lowered the opacity of this layer until the layer with the guy underneath showed through just enough to give the impression I wanted.
That's it! Play around with the tricks you've learned here and soon you'll be able to convincingly submerge anything you'd like. |
|
|
Latest Forums Clone YourselfThat is quit nice. But I think that can be more easy to do.. |
