Reviews, updates and in depth guides to your favourite mobile games - AppGamer.com
|
Tutorials
Retouching a photo. Step 3: Color balancing techniques.
Oct 18th 2005
|
Retouching & Color Correcting 3: Adjusting Color Balance:
|
|
1.
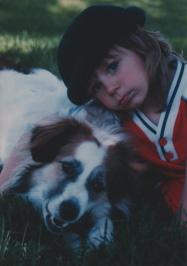
We first saw my sad scan to the left in the first step of this tutorial, Retouching & Color Correcting1: Adjusting Levels. I used the levels command there to adjust the value range by establishing a wider tonal range.
In the next step of this tutorial, Retouching & Color Correcting2: Adjusting Curves, I used the curves command to adjust some of the darker values without altering the lighter ones.
Now I'll use the Image: Adjust: Color Balance... command to greatly improve the color of this image. Don't leap ahead now to see the miraculous changes at the bottom of the page! Pay your dues and let's go through the steps to adjust colors.
|
 |
2.
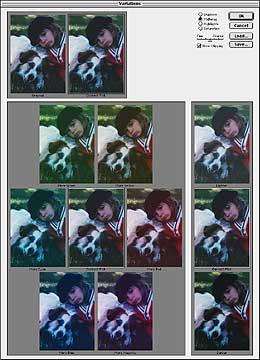
Before we get into the fun, you've got to see the Image: Adjust: Variations... option! This is a great no-brainer command that lets you see and execute instant color and brightness variations to your image. Just about everything I'm going to eventually do below, I could accomplish here. This is one of those things like layer effects, filters and pre-made actions that's so easy, any idiot could do it! (I really have mixed feelings about these because I think when you use some of them, the makers of Photoshop are more responsible for your image than you are. In other words, it's hard to take pride in your work.) But I know from experience that beginning students love these features when they are introduced to them. I'm not going to analyze each part of this feature. It's really self explanatory when you look at it. You can click on areas such as, "More Red" and instantly watch that areas move over and get applied to you image. It's really quite fun and you should try it.
One thing I will point out are the buttons that control which tones the variations represent. I used this feature to click on Shadows and it gave me a clearer idea of which way to proceed when I adjust the color balance below. |
|
|

|
3.
Remember, it's a good idea to use Photoshop's Adjustment Layer function for any adjustments you make.
Choose Layer: New: Adjustment Layer
Now, all the color balance changes will take place on a separate layer than the original image. |
|
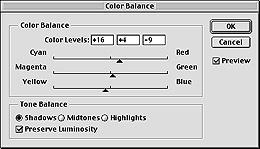
4.
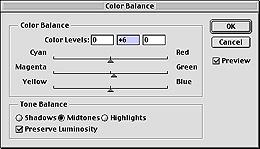
When the Color Balance Dialog Box makes an appearance, you'll see three sliders. You click on the triangles beneath each and move them, observing the instant results in your image (assuming you have the Preview box checked). When you move toward Red, the Cyan level is reduced, and the Red level increased. If you slide toward Blue, you see more blue and less yellow in your image. The color pairs on the sliders are complementary colors- sort of like opposites.
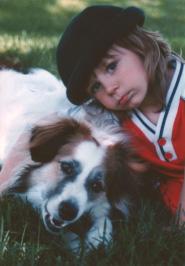
In the dialog box at the top left, you can see I make a tiny adjustment to the green levels in the Midtones. But most of my work was done in the image's Shadows. In the untouched image in the middle here, you can see that it seems "too blue". So my first move was to reduce the level of blue, and then cyan (a greenish-blue). I upped the green level here a little as well. Notice the Color Levels: boxes at the top. Photoshop gives you a variable for reference so you have a great degree of control. Here's where the Color Balance Command really wins out over the Variations Command we saw above. To use this you must have some knowledge of Color Theory, but you can control changes to a much smaller degree. In Variations, you can't control as well (and don't even know) how much color is added to your image. |
|
|
5.
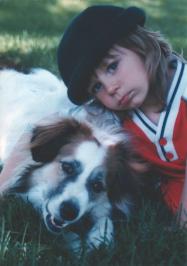
Here's the before and after images finally. All in all, no huge changes were made in the Color Balance Dialog Box. The largest number was 16 (for the amount of Yellow added). But I'm sure you'll agree the results are dramatic. Flesh tones are instantly more life-like, and the blues (which are present in the original photo before scanning- blame the film processor for bad color correction) are gone.
I've still got more to do on this photo. Remember, all the changes I've perpetrated so far have affected the entire image. Next I'm going to make selections of certain areas and see if I can finally be satisfied with colors and the brightness level. To continue following the action, proceed to
Retouching & Color Correcting 4: Adjusting Hue/Saturation
|
|
|
Latest Forums Clone YourselfThat is quit nice. But I think that can be more easy to do.. |
|
|
