
Scan Line Effect
Jul 6th 2007
| A simple tutorial suitable for beginners to add a scan line effect to any image. | |

|
First, open up the image that you want to apply the scan lines to. Next start a new image, this will be for the scan line pattern. For the purpose of the tutorial make it 2x2 pixels, you can obviously experiment yourself with different sizes. When you create the image, set the backgroun to be transparent. |
|
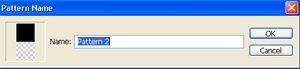
Zoom in quite a lot until the transparent background looks really obvious then take the mask too and mask off the top two pixels. Now go to Edit > Fill and fill those selected pixels black (or any other color). Now remove the selection/mask (CTRL+D in windows), and go to Edit > Define Pattern. A box should appear with your small 2x2 image with a prompt for you to enter a pattern name, just call it something appropriate to you and press ok. |
|
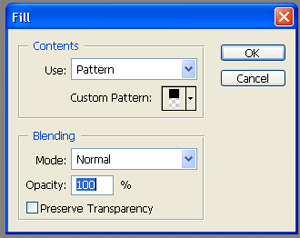
Now select your original image that you want to add the scan lines to and go to Edit > Fill, in the box that appear select Use: Pattern. Your pattern that you saved should be selectable from the custom patterns drop down box which appears. Select that and click ok. And voila... You should have a scan line effect applied to your image. |

|
If you are just seeing the pattern, that you probably did not set the 2x2 image as transparent in the beginning, or masked all of the area of the 2x2 image instead of just the top two pixels. |