Tutorials
Using the lasso and magnetic lasso to make your selections.
Oct 18th 2005
|
Making Selections: Using the Lasso and Magnetic Lasso:
|
|
1.
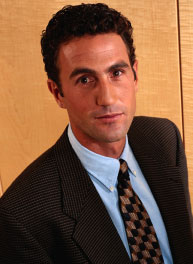
Who can't get enough of making selections? Let's pretend I've got this picture of this guy to the
left and I want to select him and get rid of the background.
What tool should I use? I could use Select: Color Range... to select the background, but because of his skin tones, I'm afraid that command would grab too much of his skin as well, making too much work for me. The Magic Wand might be a better choice, but I think I might run into the same problem when the wand can't differentiate between the right side of his face and the background. Besides, I'm here to demo the Magnetic Lasso  and the Lasso and the Lasso  also known as the Freehand Lasso in some circles (my house.) also known as the Freehand Lasso in some circles (my house.) |

|
2.
The Magnetic Lasso is a great, time saving tool. But much like the Magic Wand, you've got to find
the right image. You want the thing you select to have a very different color or value than it's
background. Our image of Mr. Businessman above is pretty good but it will present enough challenges
so you won't fall asleep.
The tool works like this: you drag it somewhere near an edge you want to select and it leaves a marquee selection line along the area where it finds the most difference, or contrast.
Double click the Mag. Lasso to see its options palette (left). In the Feather field, you can type in a pixel value if you want your selection to have an imprecise, soft edge. Lasso Width is the number of pixels the tool "looks at" in the vicinity you move it. For an image that has very clear high contrast edges, high numbers are OK (40 is the highest). For an image with more subtle, low contrast edges, enter a lower number. Frequency is the number of points the tool lays down along the selection line. Use low numbers for smooth edges and high numbers for a very irregular edge. Edge Contrast is the amount of contrast needed for the tool to find an edge. Low contrast edge = low number; high contrast edge = high number. |
|
|
|
3.
Here I go... I'm "magnetically" lassoing this guy at a slightly larger magnification. You'll soon get a sense of how this tool works if you use it a few times. You don't have to be incredibly careful about where you place your cursor if the edge is very different than its background (such as here), so you can move pretty quick.
It's really quite impressive, since I remember the days when all outlines had to be done with the "regular lasso". The old lasso draws an outline precisely where you move your cursor. That has its advantages, though, as we'll see later.
Tip: One great feature of Photoshop is, when you're working at high magnification, like I was here, you can move around in your image by pressing the space bar. As soon as you do, your magnetic lasso cursor disappears and is replaced by the hand tool  . You can now drag and move around, changing the portion of the image that is visible in your window. This works for most of the tools. Try it! . You can now drag and move around, changing the portion of the image that is visible in your window. This works for most of the tools. Try it! |

|
4.
All right! I've done my outline using the magnetic lasso only (except for the places where his
body leaves the image frame - it's easier to use the freehand lasso there.)
I copied and pasted him on an upper layer and put a solid layer of blue beneath so you can see the edge better. The outline is not bad. Part of his ear got cut off, and since I think that would hurt, we'll have to eventually fix it. |
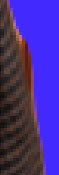 |
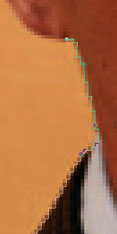
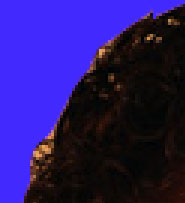
4. (continued)
The two images to the left are close-ups so you can see where the magnetic lasso did less than
perfect.
Hair is one of the nastiest things to outline. Frequently when I look through magazines and catalogs (especially the cheaper ones), I'll see a bad outlining job and 9 times out of 10 it's the hair they messed up on.
Here you can still see lots of yellowish pixels left over from the background. And many of the hairs I would have selected if this had been a freehand outlining job got left out.
The image below shows part of his sleeve on the right side. Some of the background accidentally got selected.
We can fix all of this of course, but we're going to need the precision of the Freehand Lasso. |

|
5.
What I do next is blow the image way up and use the lasso tool to fix the outline where the
magnetic lasso fell short. To the left is the finished outline.
Tip: To zoom in and out when working on the image I rarely use the zoom tool.  I find it much easier to use the keyboard shortcuts. To Zoom In (magnify) press [Command-plus] (for Windows- [Control-plus]). To Zoom Out (scale down) press [Command-minus] (for Windows- [Control-minus]). I find it much easier to use the keyboard shortcuts. To Zoom In (magnify) press [Command-plus] (for Windows- [Control-plus]). To Zoom Out (scale down) press [Command-minus] (for Windows- [Control-minus]). |

|
6.
While zoomed in I simply add to the selection where needed by holding down the Shift key and outlining. I can subtract from the selection by outlining while holding down Option (windows=Alt). Compare the improved hair with that earlier version above.
The outline is as good as it's going to get. I'm sure you can see there's still lots of pixels that contain some yellow. I'll delete these another way. (I sense a sequel here)
Tip: When doing delicate outlining work, it's a good time to own a graphics tablet and stylus. I'm so used to working with the mouse, I rarely use mine. But whenever I have to deal with hair, I drag it out and fire it up. Drawing with the stylus gives you much more control- much like tracing with a pencil. If you come from a visual art (drawing) background, you might love a graphics tablet. It's also good for doing brushstrokes. I'm told even the small ones work pretty good. They say you can judge a person by the size of his graphics tablet, however. Mine's 18" x18", thank you very much. |
 |
7.
Here's a finished version of our favorite corporate guy over a new background. I've taken care of
all the residual bits of yellow that were clinging to his edges.
To find out how I did this, see the tutorial on Blending Edges in a Composite Image to find out how. (Oh, I was right! There is a sequel!) |
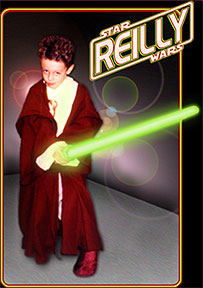 |
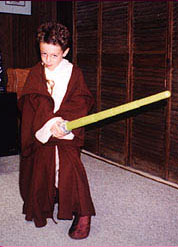
example 1:
To the left is a photograph taken of my son in his Halloween costume, a Jedi Knight. I took this
photograph with the specific intention of retouching it in Photoshop. It might have been nicer had
I not taken it against a brown background (which just about precludes the possibility of using the
magnetic lasso very easily.) But oh, well.
I needed to make an outline to select my son's entire body, so out came the graphics tablet and on went the Lasso Tool. About 10 minutes later, the outline was complete, and I was free to do whatever I wanted with the background.
The finished image is presented here to the left, below the snap-shot. I printed it out on transfer paper and made my son a T-Shirt that he and all his friends loved.
Though I thought I might stick an actual scene from Star Wars in the background, I instead opted to make a pretty nondescript one and focus more on the lens flare. This is Photoshop's Render: Lens Flare Filter which I scaled to suit my needs. I've also put something of a shadow under him and made his toy light saber more "realistic." |
 |
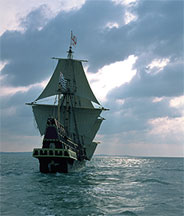
example 2:
A great deal of selecting went on here. To the left you can see the untouched photo of the ship as I
found it. Though it ultimately became a super-composite photo (below), I did a good deal of retouching
on the image by itself before combining it with others.
I took a selection of the ship of course, using a combination of the Lasso and Magnetic Lasso. I used the Select: Color Range command to make quite a few selections of various parts of the water and the sky for the purpose of colorizing them.
In the final image you can see I've extended the sky to the right about 25% (mostly through the use of the Rubber Stamp Tool.) I've also layered many images (which of course had to be outlined in their original files), varying the transparency of the layers on some of them.
Keep selecting! once you get the hang of it, you can create complex altered/composite images.
Happy Image Editing! |
|
|
Latest Forums Clone YourselfThat is quit nice. But I think that can be more easy to do.. |
