Reviews, updates and in depth guides to your favourite mobile games - AppGamer.com
|
Tutorials
Using the magic eraser
Oct 18th 2005
|
Using the Magic Eraser:
|

 Â Â
|
1.
Just Click & Erase...
The Magic Eraser Tool  was new with Photoshop 5.5. It's yet another option you have when your desire is to separate an object from it's background. was new with Photoshop 5.5. It's yet another option you have when your desire is to separate an object from it's background.
What's with backgrounds anyway? Photos just keep featuring them, then we, with the help of Photoshop, just keep eliminating them. Since there's no sign that photographers are going to stop putting these darn backgrounds in their images, Photoshop delivers with many ways to make selections. There's all the marquee tools, and the masking modes to name but a couple. Getting rid of a background makes compositing images easy. Just get rid of one background, slap another one in there, and that's it. Composite image.
The magic eraser works much like making a selection with the magic wand tool  and hitting the clear key. (See the tutorial, Making Selections: Wielding the Magic Wand) and hitting the clear key. (See the tutorial, Making Selections: Wielding the Magic Wand)
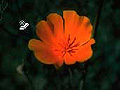
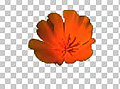
In the images at left, I found an image of a flower with a background that was pretty close in color & value, I clicked with the magic eraser as you see in the second and Bam! (Isn't there some cooking show that says that?)- in the third image my background is gone. Well it wasn't exactly "Bam!" It took a little experimenting to find the right settings for the eraser to rid myself of the entire background. I'll talk about the rest of the settings later on, but the variable I'm concerned with here is the Tolerance. The higher the number you type into the Tolerance box, the more pixels the Magic Eraser will eliminate. A low Tolerance will delete pixels only similar in color & value to the one you click on. A high tolerance will increase the range of values and colors that are deleted, relative to the pixels you click on with the eraser. I had to type in a tolerance of "95" before a single click would eliminate my entire background in the orange flower image at left.
 |
 |
 2.
How "Magic" Was The Eraser?
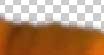
Here you can see a magnification near one of the petal edges. The Tolerance setting of 95 did a pretty good job of erasing the background. You see here one of the few spots where we have a remnant of the original background. This is to be expected in photographic images. Foreground objects will blur with their backgrounds, so edges will rarely be crisp & clear. I might fix this with another click with the Magic Eraser, or simply "paint" it out with the regular eraser. |
|
|

|
 3.
Fixing The Edge
Most of the flower's edge looked as you see it to the left. It was a pretty good job, but even with Anti-aliased checked, the flower's edge still looks a little too jagged. I'll talk more about the Anti-aliased setting below, but for now you should just know that you should leave it checked when dealing with photographs. It will result in a more natural looking edge.
But if I want my flower to blend in a little more naturally with whatever new background I choose to place behind it, I want to blur the edge a little first. After selecting the flower, I chose Select: Modify: Border and created a selection a few pixels wide around the edge. I feathered it a couple of pixels, then chose Filter: Blur: Gaussian Blur and blurred it what I thought was the appropriate amount. In addition to helping the blend look more "real", this also minimized some of the ugly greenish-tinted pixels which still lingered on the flower's edge. |


|
 4.
Checking/ Un-Checking Contiguous
There's a control switch for the Magic Eraser settings labeled Contiguous. This can be a useful control for getting exactly what you want out of our tool.
I used the graphic to the left to illustrate this one. In the middle image, I clicked with the Magic Eraser in the center with the Contiguous control checked. This way the eraser only deletes pixels which are next to each other.
But if you really want to do some "magic" erasing, try clicking on an image such as this with the Contiguous control unchecked. In the bottom image I had the eraser set that way and I clicked in the exact same spot. This time the tool not only deleted the center circle, but the outside color as well. Why? Because they were the exact same color.
Now if you want to rid a nice graphic of just one or two offending colors, you've got another option. |
  
|
 5.
Alias or Anti-Alias?
Now I want to get back to a control I mentioned earlier, the Anti-Aliased check box. Anti-aliasing minimizes jagged edges. An "aliased" edge is a sharp, jagged, pixelated surface- sort of like steps on a stairway. Leaving the Anti-Aliased control unchecked before using our Magic Eraser will result in a more clean stepped edge, such as in the image close-up on the far left. Checking the Anti-Aliased control and then magically erasing gets you a smoother, blurrier edge such as in the close-up on the immediate left. |


|
 6.
Another Magic Erase
If you haven't guessed it by now, the magic eraser works best when dealing with flat colors and values, such as those found in graphics. For photographs, quite frankly, I'd use another method if you know one, unless the background happens to be a really flat color, such as completely "white."
I'd like to show you one more way I used our favorite tool before you part. Let's say you've got this graphic, like the one at upper left. You would like to make the lettering transparent, but the fool who created the file didn't leave it in Layers. It's a flat image. To rid yourself of the black letter forms, you could Select: Color Range with the default foreground color and then delete the selection, or you could more efficiently use the Magic Eraser. With one click in any of the letters (with Contiguous unchecked) suddenly all the black letters disappear and a beautiful rose image I placed underneath now shows through. Happy Magic Erasing! |
|
|
Latest Forums Clone YourselfThat is quit nice. But I think that can be more easy to do.. |
|
|
