 |
1.
Difficult Selections?
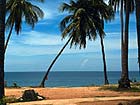
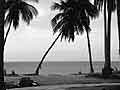
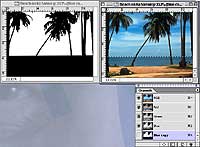
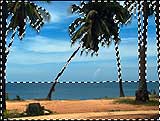
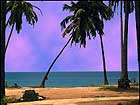
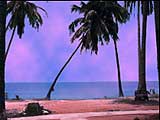
There are so many ways you can make selections in Photoshop. The trick is getting to know them all so that you can choose the quickest and easiest method for a particular photo. This one is a little unorthodox but is going to save you a ton of time on the most difficult selections. Cast your eyes leftward and marvel at the seemingly daunting task you would face if you wanted to replace the sky on this photo of palm trees. How can we outline all those leaves?!? The answer this time lies in our Channels Palette. |
|
|
 2.
The Channels Palette
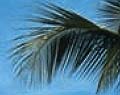
From now on, whenever you are faced with a selecting job that looks like it will take you hours, I want you to first check out your channels palette. The Channels Palette is where the color information for your image is stored. An RGB image, like I have here, is divided into it separate Red, Green & Blue Channels.
If you've ever saved a selection on an image, the channels palette is where it is stored. A saved selection is stored as an Alpha Channel, a grayscale representation of the selection. The selected area is represented by black, and the unselected area by white. Those of you familiar with Layer Masks will be comfortable with the grayscale work we'll be doing here. However, in an Alpha Channel the Black & White Display is an Inverse, or opposite of how a Layer Mask would appear.
To get those disagreeable palm fronds selected nicely I examined each color channel. I found, by looking at the thumbnail images, that the Blue Channel showed the most contrast between the palm trees and the background, and that's what I'm looking for. If a channel can be converted into a selection, as I mentioned, then most of my work may be done for me if I can exploit this blue channel. I don't want to damage my blue channel, so I'll make a copy of it first. You can duplicate it through the palette's command menu; but the quickest way is to click and drag the channel down to the Create new channel icon (3rd from left) down at the bottom of the palette. A copy is created as shown in my image.
In the bottom image, you see the blue channel displayed in grayscale. This is the default display mode for individual color channels, unless you select otherwise in the Display & Cursors Preferences. |
 |
 3.
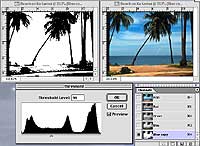
Threshold
To fine-tune our selection, I'm going to use the Threshold command. Threshold command changes our duplicate color channel to a high-contrast, strictly black and white image. When you first open its dialog box, the middle value is the threshold. Every pixel above the threshold is white; all pixels below the threshold is black. You can see how my copied blue channel looks with the default middle threshold. Already we can see this was a good channel to use. You can see how the trees are silhouetted against the sky. |
|
 4.
A New View
Before I adjust the threshold, I want you to see how I am working. Before I chose Image: Adjust: Threshold..., I clicked on View: New View. In my new view I activated all the channels by clicking on the master RGB Channel at the top of the palette. Now I can see my image in full color and while I activate my copied image and apply the Threshold command in the other view.
In the Threshold Dialog Box, use the slider below the histogram to adjust the threshold until everything you want selected is shown as Black. |
 |
 5.
Blackout
Here's what my channel looked like once I had found the best threshold point. Since I want to be able to replace the sky in this image, most of my selecting work is done already. Notice that there's still a little white showing in the foreground. I don't want that, so I could just take any painting tool and use black to cover it. But since the horizon line at top of the ocean is so straight, what I did instead was use the polygonal lasso tool to draw a selection of the ocean and beach in my full color "view." Then I clicked back on my black & white "view" and filled the selection with black. |
 |
 6.
Blurring The
Channel
I've got everything I want selected now that I need, but not the way I need. With only the two values of black & white the Threshold operation had to display, the image looks too jagged. I want my selection to have softer, feathered edges to it. I choose Filter: Blur: Gaussian Blur and blur the image slightly. It won't take much; mine was only a 0.8 pixel radius. |
 |
 7.
Expanding /
Contracting
Here's an option you can use if you need to grab a little more of the image. After blurring, you can use the Image: Adjust: Levels command to increase or decrease the black areas (what will be selected). Slide the middle triangle to the right to expand your selection; or to the left to contract the selected portion. |
 |
 8.
Load The
Selection
The time has finally arrived to activate our selection. Hold down the Command or Control key and click on your duplicate channel. As in my image, you'll see a marquee surrounding the areas that we made black in our doctored-up channel. |
 |
 9.
Got It!
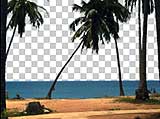
Well, all our hard work paid off! We've got a great selection that really didn't entail any hard work at all. You can do a number of things now. I'll apply a layer mask later on in Step 12, but in the image at left all I did was copy and paste what I had selected to a new layer. I turned off the background layer so we could see just how good those trees got selected.
In the bottom image I filled a lower layer with a simple "clouds" design for a new sky. |

 |
 10.
Oh, The Humanity!
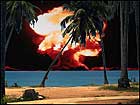
Good Lord! What has happened to our tranquil seascape? Here I've obviously stuck another image on a layer beneath the beach and palms. I'll need to select the water so I can create some sort of reflection if I want this to look a little more convincing.
I found that the Red Channel had a decent amount of contrast between the water and tree trunks, so I duplicated it and repeated the process described in Steps 2-6 above until I had the channel you see to the left. |
 |
 11.
Finishing Touches
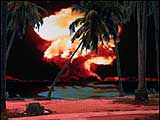
With the "red copy" channel I made above, I've got a great "saved selection" of the water. Using it I flipped and scaled the mushroom cloud image and blended it in the water.
To colorize the beach quickly, I chose Image: Adjust: Hue/ Saturation. In the Edit: pop-up menu I chose the Yellows channel (since the beach had mostly yellow hues in it.) Then I just moved the Hue and Saturation sliders until I had a color that seemed more "natural." |
|
 12.
Layer Masking
Getting back to our less disturbing image, I wanted to show you another option. Assuming you're not working on the background layer, once you've created your "selection channel," rather than copy and paste like I did for Step 9 above, you can apply a layer mask. Once you've got your selection active, simply click on the Add a mask icon on the bottom (2nd from left) of the Layers Palette.
As I did in the image at left to make a water reflection, the mask will only allow the image to show through in the area you had selected. The area outside the selection is masked off. In my image, I duplicated the sky layer, lowered the opacity so the original water would show though a bit and applied the mask. As in Step 11 above, I tinted the beach slightly. |
  |
 13.
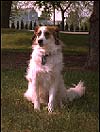
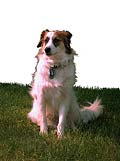
Hairy Beast
Let's see another example you should find useful. One of the most difficult things to outline is hair. With indefinite edges like those shown at left, it's almost easier to airbrush in new edges later than it is to select them. |
  |
 14.
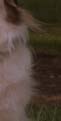
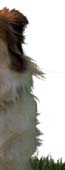
Blue Channel
The blue channel came to the rescue again. By taking the steps I showed you above I was able to create the channel you see at left in just a few seconds. Though this image will obviously need a lot more touch-up work than the beach scene, using a duplicate channel has done 75% of my work already. |
  |
 15.
After Some Painting...
I painted in the rest of the dog that I needed selected. I could have kept going on his bottom half, covering the grass, but for this job I wanted to include the grass so after some selecting and painting, my channel looked like the right image. |
  |
 16.
Let's Take A Look
After loading the selection from the channel I made I hit the delete key and got rid of the background nicely. You can see how the channel method did a decent job of giving us a nice edge on the hair. |
 |
 17.
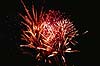
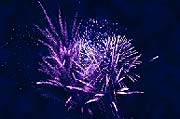
More Applications
Though other methods such as Color Range would have worked on the image at left, I selected and altered the fireworks and sky using the channel method.
Now you know all the tricks. This method is not going to work on all images, but whenever I'm faced with a difficult selecting job, I always check out my Channels Palette. Frequently I find something I can use there. |