
Clone Stamp and Blur
Jul 6th 2007
| OK ... We just took a great photo, but on closer inspection there appeared to be a bit of a bogey in one of his nostrils. While we can get away with this for a small photo, once we tried printing this out onto A4 it was clearly visible... So... How can we get rid of it... One method would be to use the clone stamp and blur tools. | |
|
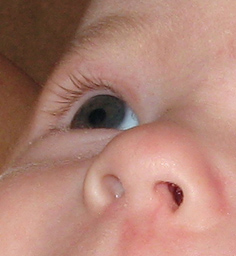
So... Here is a close up of the said nostril ... As you can see the booger is there ... Screaming at you even... So it has gotta go! |
Select the Clone Stamp icon ( ), because we are manipulating a small area, we want the brush to be quite small, so set it to about 3 pixels. Now we need to define the area we want to clone, so hold down the alt key and left click the dark area in the right nostril. Let go of alt, and the click in the area in the left nostril, you should see it start to fill the same color as where you originally did the Alt-Click. ), because we are manipulating a small area, we want the brush to be quite small, so set it to about 3 pixels. Now we need to define the area we want to clone, so hold down the alt key and left click the dark area in the right nostril. Let go of alt, and the click in the area in the left nostril, you should see it start to fill the same color as where you originally did the Alt-Click.
|
|

|
Once the nostril has been sufficently filled, use the blur tool ( ) to even everything out. Set the size of the clone brush to really small, maybe 3 pixels, but it all depends on the size of the area you are manipulating, if you require greater accuracy, then set it small.
And here is the finished article. ) to even everything out. Set the size of the clone brush to really small, maybe 3 pixels, but it all depends on the size of the area you are manipulating, if you require greater accuracy, then set it small.
And here is the finished article.
|