Tutorials
Part 4: Complex Reflections
Oct 18th 2005
|
Creating Reflections:
|
|
1.
A long time ago...
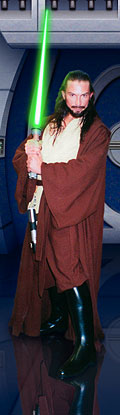
Welcome back, true believers! I'm finally going to finish off with that Halloween costume photo of my son & I and put us in our homemade sci-fi background. We might even meet some unfriendly-types, but first we're going to need to cast reflections on the floor. That's no simple task, as you'll see.
But first, if you missed any of the previous chapters, check out Make a Good Selection and you'll see how I removed the figures from their original photos.
In Create a Light Saber Blade I did just that. Twice, in fact. Now you can, too.
Lastly, in Create a Sci-Fi Background I did my best to make a suitable environment for two Jedi Knights with out violating any copyright laws.
Which leads us to the present. I had been dreading having to deal with the solution of what to do about the reflections these two figures might cast on the floor. A reflection is a very hard thing to do unless:
-the object casting the reflection is facing us squarely and has a perfectly flat, straight bottom edge
OR
-you have a photograph of the reflection needed
Neither case applied here, but as you can see at left all was well in the end, so let's see how I dealt with it. |
|
2.
Seeing Double
The photo of Mr. Photoshop dressed as a Jedi featured a carpeted floor so I had to imagine what a reflection of this figure would look like. In the end I'd say it's 80% accurate and good enough to fool most observers.
I knew I wanted some space before getting to work so I went to Image: Canvas Size... and increased the room at the bottom of the file by entering a larger number for the height and making sure the existing stuff would be anchored at the top.
The only thing I had to aid me was the original photo so I started by duplicating that layer. To do this quickly, go to your Layers Palette and click on your layer and drag in down to the Create new layer icon. That's the one that resembles a piece of paper with a folded-over corner.
Next, I flipped the layer in question by choosing Edit: Transform: Flip Vertical.
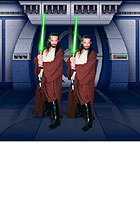
In the image at bottom left, I've moved the reflection into place, and if you couldn't imaging it before, now you can see exactly the job I'm up against.
You see, reflections may resemble the objects which cast them, but that's because we're seeing them from the same angle, and at first glance they simply look like an upside-down version of their source. In reality, they are and entirely different view. What you see in a reflection is like being at an ant's point of view and looking straight up at the source of the reflection. You start to see a lot of things you can't in the original, like the under-sides of things. |
|
|
|
|
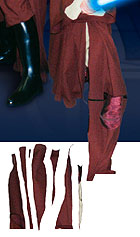
3.
I Fall To Pieces
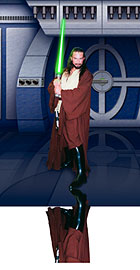
To start with, I knew that everything that touched the floor on the bottom of my figure- each fold of the robe; both boots- would need it's own individual reflection which meets it at floor level. You can see how I began. I traced each piece of the reflection I thought needed to be broken up and separated the pieces so I could work with them individually. (The complete version of my legs in the lower right is for reference only.) |
|
4.
That's Gotta Hurt
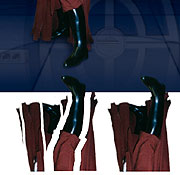
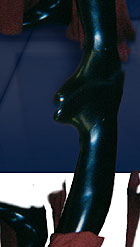
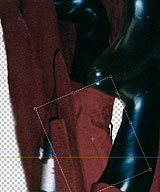
I started by tackling the front foot. I moved it into place and used the Edit: Transform commands (Scale; Perspective, Skew; & Distort) to make the reflected boot distorted properly.
But it still wasn't good enough, though the heel and toe meet up, there's a lot of over-lapping that shouldn't occur. Here's where the Liquify filter came into play. I drew a rectangular marquee around the area of the boot I wanted to work on |
 |
5.
Liquify
I rarely use Liquify, but when I do, I'm so glad it's there. You can do the things Liquify does in a previous version of Photoshop, but it's about 5000 time harder. I chose Image: Liquify... and used the Warp Tool  to do all my pixel-shoving. Warp takes the form of a paint brush with options for brush size & pressure and a few swipes with it will let you know exactly what it does. It grabs pixels where you first click and pushes them where you drag to. to do all my pixel-shoving. Warp takes the form of a paint brush with options for brush size & pressure and a few swipes with it will let you know exactly what it does. It grabs pixels where you first click and pushes them where you drag to.
I soon remembered that to speed up the Liquify filter, draw a rectangular marquee around the area you want to work on first. Otherwise, it loads the entire layer, which takes longer to process once you click OK to exit Liquify.
Also, I wish Liquify allowed you to see the other layers while working- it only displays the active layer. That made getting the shape of the boot right more difficult. |
|
6.
Distorting
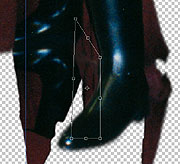
I soon fell into a pattern of moving a piece of the reflection into place, using the Edit: Transform commands to distort it, then using the Liquify filter or the Clone Stamp Tool  to repair the damage. to repair the damage.
In this image, I'm distorting part of the robe and I have the foot from the last step temporarily hidden. |
|
7.
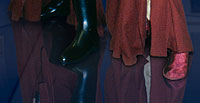
The Gaping Hole
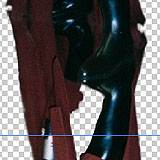
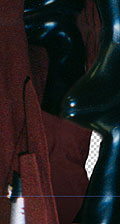
Here you can see how things are shaping up, everything looks pretty good with this on exception. I have nothing in between the front leg and the robe on the left. This is where the reflection would be showing us more of that back leg and the inside of the robe. What could I do? I began feebly cloning on that back leg you might notice, but I soon realized there just wasn't enough source material there.
Notice the blue guide line. That represents the real bottom of the image. Anything falling below it, I didn't have to worry about. |
 |
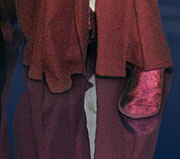
8.
The Solution
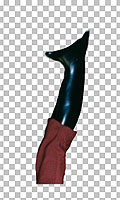
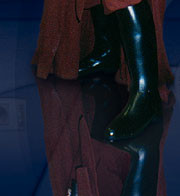
I decided to take the unused upper portion of the front leg (see step 5 above), and have that become the part of the rear leg I needed. In the image you see me rotating it into place.
Notice the brightness difference. After I put it in place, I made a trip to Image: Adjust: Hue/Saturation... and tried to match up the values. |
  |
9.
A Tangled Web
Here you can see how that turned out. Not too bad. And all I have to do is fill that small area with a patch of dark robe material.
I felt reassured that any insufficiencies in my fake reflection would be made less noticeable by two things:
1- I would be lowering the Opacity of the reflection so the floor would show through.
2- I had a shadow immediately below the Jedi that would hide a lot of the meeting-up space between the reflection and the feet.
Notice my Layers Palette there. You can see how many layers made up the reflection and how I named them and put them in their own Layer Set. |
 |
10.
Ta-Da!...
There it is, and isn't it a beautiful thing? |
 |
11.
The
Big Picture
That one took a lot out of me and before I could rest, I had to create another reflection, for my son. This one turned out to be easier, simply because I knew how to approach it. |
 |
12.
One more..
Here's me working on that second reflection. You can see how I took the same approach, breaking the shape into pieces. This one had a lot more!
Here's how it turned out:
 |
 |
13.
Ahhh...
Remember your main tools after duplicating & flipping your source. Use the Edit: Transform commands and the Liquify filter to distort the shapes as needed, the Clone Stamp Tool to copy small areas & fill gaps created during distortion. Don't be above selecting and copying large pieces to fill big gaps (as I did in step 7 & 8).
Also, you've got to figure out what you should be seeing in the reflection. I made several trips to the nearest mirror to use my fingers against the glass to imitate what the legs were doing, then observe what I would be seeing in my image here. |
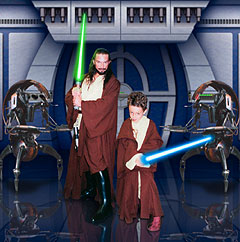 |
14.
The
Final Image
Here's how it ended up; as of now at least.
It was a difficult choice putting those droids in the background, because it covered up so much of my hard-earned detail in the background. I'm not sure if I'll keep them or replace them with something else, like stormtroopers or whatever. (If I do keep them, I have to fix the shadows.)
My actual image is 8" x8" at 300dpi, so you can't appreciate all the detail in this shrunken JPEG. But anyway, I'm going to print out a T-shirt transfer so my son can be the envy of the 1st grade.
Now, if you made it this far in the saga you deserve a reward. Click on this image:

to get your very own version of my Sci-Fi background (minus the figures). You can paste yourself or whoever you like there. Don't say I never gave you anything! |
|
|
Latest Forums Clone YourselfThat is quit nice. But I think that can be more easy to do.. |
