Reviews, updates and in depth guides to your favourite mobile games - AppGamer.com
|
Tutorials
Lets make some Yummy eyeballs
Oct 18th 2005
|
Techniques: Creating Eyeballs
|
 |
1.
As much as I hate
remaking other tutorials I got permission from the site marblemad.com to use part of his technique and translate it (thanks!).
Lets start out by creating a new 400 x 400 image. I'm using a white background and you need to choose a color for your eyeball (I'm going to use a blue color). Create a new layer  and then create a perfect circle (hold down your shift key while dragging). The circle you make should be larger than you want the size of your eyeball to be at this point. Now fill it with the eyeball color you chose. and then create a perfect circle (hold down your shift key while dragging). The circle you make should be larger than you want the size of your eyeball to be at this point. Now fill it with the eyeball color you chose. |
|
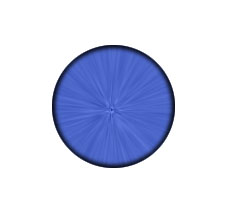
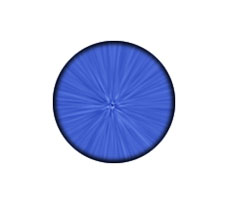
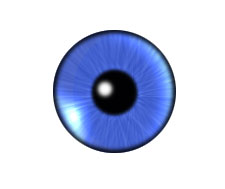
2.
Now leave the circle
selected and go to filter/noise/add noise. Use the settings of 50 for the amount,
Distribution-Uniform, and check the Monochromatic box. Now deselect the circle (Ctrl+D) and go to
filter/blur/radial blur and use the settings of Amount 100, Blur Method-Zoom, and Quality-Best, after
you run this filter run it once more at these settings. You should now have something that resembles
the image I have here.
|
|
|
|
|
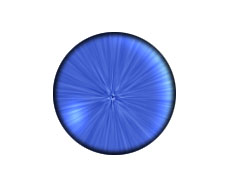
3.
Now it's time to find our
eyeball out of this image. Find the most center point in the circle we made and make a perfect circle
selection in it. To give you an idea of what I mean take a peek at the picture I have here. Once you
have your selection where you want it go ahead and hit Ctrl+Shift+I to invert the selection and then
hit your delete key. Now you should be left with nothing more than a nice clean circle with our
eyeball center. Go ahead and name this layer eye_base. Now drag the eye_base layer into the create new
layer button to duplicate this layer. Name this layer top_eye (You should hide this layer for right now). Ok at this point you should have your background layer and two layers of the eyeball. |
|
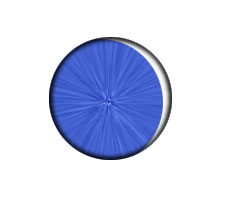
4.
Now go back to your
eye_base layer, Ctrl+Click on it to select it and go to select/modify/border and use a value of 4.
Create a new layer "above" the eye_top layer and name this layer shade1. Fill this layer with black and deselect it. Now go to filter/blur/guassian blur and use a value of 4. Now Ctrl+Click on your eye_base layer (make sure you stay working on your "shade1 layer" though, we only want to select the eye_base layer not work in it). Now hit Ctrl+Shift+I to inverse the selection and hit delete. Now drag this layer into the create new layer button to duplicate and drop the opacity to 50%. You can go ahead and hit Ctrl+E to merge these two layers if you wish. |
 |
5.
Lets go back into our
top_eye layer now. Ctrl+Click on this layer to select it. Now go to filter/sharpen/unsharp mask and
use the values of Amount= 390, Radius= 2.5, and Threshold= 0. Change the layer mode to Soft Light and
drop the opacity to around 40%.
|
 |
6.
Now Create a new layer
directly above the eye_top layer and name this layer Highlight1. Go back to your eye_top layer and
Ctrl+Click to select it. While holding down your "Alt" key we are going to minus part of the selection. Minus the selection so you only have a small wedge left in the upper right corner. You create this wedge by holding down the "Alt" key and selecting every part of the eye "but" the part you want left. Thus, the minus. But you already knew that =). Once the wedge is created switch to your Highlight1 layer and fill it with white. |
 |
7.
Now set the layer mode to
color dodge on the Highlight1 layer and go to filter/blur/guassian blur and use a setting of about 7
or so. Make a new layer and call this Highlight2. On this layer create a small oval and fill it with
white. Go ahead and change the layer mode to color dodge and blur this as well. Place this in the
lower left corner of the eyeball.
|
|
8.
Ok, it's starting to look
more and more like an eyeball but we need a pupil. Create a new layer above the eye_top layer and name
it Pupil. Make a perfect circle just a hair smaller than you want the actual size of your pupil to be.
Once you have your circle made and sized how you want it fill it with black. Then go to
filter/blur/guassian blur and use a value of 2. Ctrl+Click on your pupil layer to select it. Now go to
select/modify/border and use a value of 2. Create a new layer
and name this layer pupil_highlight. Fill this layer with white, then guassian blur it by 2 and change the layer mode to color dodge. Now drop the opacity to about 50%. |
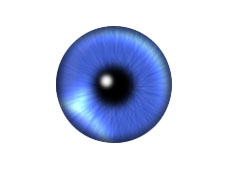 |
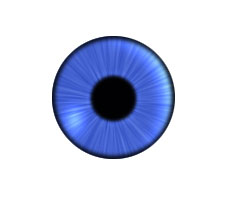
9.
No go back into your
eye_top layer and Ctrl+Click to select it. Go to filter/other/offset and use a value of 20 or so for
the Horizontal, and leave the rest at the default settings. It should be zero for vertical, and the
Set to Transparent radio box checked. That's it! All I did to finish my eye up was to add one more
highlight and add a white spec to the pupil. The image here is a full size sample of the tutorial we
just completed. If you want to make your pupil a bit softer make it a tad smaller and guassian blur it
by about 4.
|
|
|
Latest Forums Clone YourselfThat is quit nice. But I think that can be more easy to do.. |
|
|
