Reviews, updates and in depth guides to your favourite mobile games - AppGamer.com
|
Tutorials
The ultimate rusted text
Oct 18th 2005
|
Easy Rusted Text:
|
 |
1.
Start with a new 400x400 image. Choose a background that
you want to make the rusty text on. For this tutorial I
just used the action for rust that came standard with photoshop.
If you don't see it in your actions look in your goodies
folder in your photoshop directory. Once you have your background
use the type tool and create your text. The color of the
text does not matter, just make sure it is visible. Also
make sure your text is where you want it to appear in your
graphic. So move it to where it needs to be. |
|

|
2.
Next Ctrl+Click your text layer to select it. Once it is selected
click your channels tab and click the save selection as channel
button. By default it is called Alpha 1. Rename it to text.
Now with the text channel still selected drag it into the
create new channel button to duplicate it. Name this new channel
light. Leave your new light channel selected and run the Filter/Blur/Guassian
Blur with a setting of 8, then run it again with a setting
of 4, then a setting of 2, then a setting of 1. Hit Ctrl+Shift+L
to run the autolevels. Then hit Ctrl+Shift+I to invert the
selection. Once the selection is inverted hit your delete
key to remove any unwanted jaggies. Then hit Ctrl+D to deselect
your channel. |
|
|
|
|
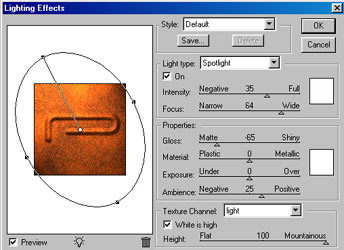
3.
Click back on your layers tab and click on your background
with the texture in it. Drag this into the create new layer
button to duplicate this layer ( name this layer rust). At
this point you can hide the text layer that you created by
clicking on the eye. Now make sure the layer named rust is
activated (just click on it normally so it turns blue in the
layers palette ) and go to Filter/Render/Lighting Effects
and use the setting that I have here. Style-Default, Light
Type-Spotlight, Intensity=35, Focus=64, Gloss= -65, Material=0,
Exposure=0, Ambiance=25, Texture Channel-Make sure you select
your "light" channel from the drop down menu, White is high, and Height=100. |

|
4.
Now with your rust layer still active Ctrl+Click on your text
that you originally made ( It should be in the layer right
above your rust layer ). This will select the shape of your
original text so we can copy it out of our rust layer. With
the rust layer still active and the shape of your letter now
selected hit Ctrl+C to copy it, and then hit Ctrl+V to paste
it into a new layer. Now you should have a layer right above
your rust layer with nothing more than your new rusty text
in it. Name this new layer effects. |
 |
5.
Make sure your effects layer is active and go to Layer/Effects/Drop
Shadow and use the settings that I have here. Note: the color
I chose was from a dark part of my background so play around
until you get a color that your are satisfied with. |
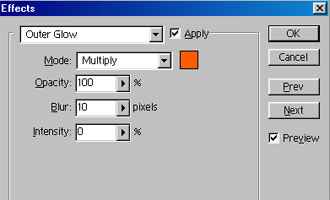 |
6.
Now on the same effects layer go to Layer/Effects/Outer Glow
and use the settings that I have here. Once again I changed
the default color to one that matched my background picture.
Also make sure you change the Mode to Multiply. |
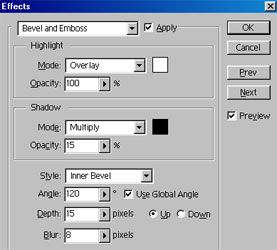 |
7.
Last but not least go to Layer/Effects/Bevel and Emboss
and run the settings that I have here.
Highlight-
Mode- Overlay with the white color
Opacity- 100%
Shadow-
Mode-Multiply with the black color
Opacity- 15%
Style- Inner Bevel
Angle- =120
Depth- =15
Blur- =8 |
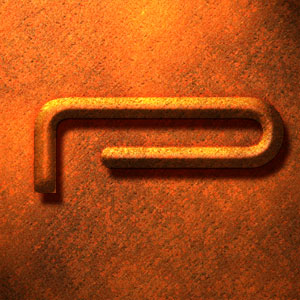 |
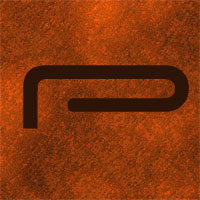
8.
If all went well you should end up with a pic like the one
I have on the left here. When you are applying your Layer
effects on your effects layer you should experiment around
with different settings to see what you can come up with. |
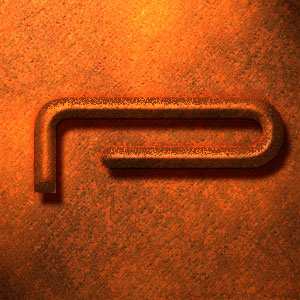 |
Just for example, here is one with the bevel and emboss highlight setting changed to dissolve and with a different color in the color box. This gives it a real nice rough edge look. Also you can drag this layer into new projects and still have the rust look and all the effects. To do this just open up a new project and make sure your move tool is selected. Then just drag this layer into your new project and you are all set... |
|
|
Latest Forums Clone YourselfThat is quit nice. But I think that can be more easy to do.. |
|
|
