Reviews, updates and in depth guides to your favourite mobile games - AppGamer.com
|
Tutorials
Retouching a photo. Step 6: Airbrushing & Cloning.
Oct 18th 2005
|
Retouching & Color Correcting 6: Airbrushing & Cloning:
|
|
1.
The Story So Far...
In steps 1 & 2 of this tutorial I corrected the value of my image via the Levels and Curves Commands.
Next, in Step 3 & 4, I used the Image: Adjust: Color Balance... and the Image: Adjust: Hue/Saturation... commands to make color changes to the image. Most recently I used the Dust & Scratches... filter to get rid of the tiny stuff that plagued my scan.
Now I'm going to magnify sections of my image and correct the larger imperfections by airbrushing & cloning.
|

|
2.
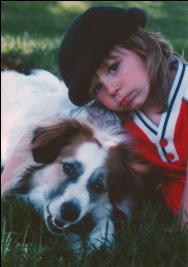
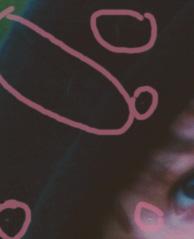
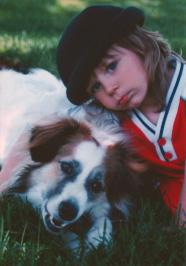
In the images to the left, you can see some areas I plan on working on. You should magnify your
image and move around examining each section closely. When you're at a high magnification, just
press the space bar and whatever tool you have becomes the Hand tool  . You can easily click and drag to move around as long as the space bar is held. . You can easily click and drag to move around as long as the space bar is held.
Hat: The small areas are some big dust specks that escaped our filter earlier. Look close in the long oval. There's a weird sudden change in value and you can see a thin dark area running down to the brim. Let's get rid of it.
Dog's Nose: There's a big line here that's either a hair or a scratch on the photo. It's got to go!
Tip: To zoom in and out when working on the image I rarely use the zoom tool.  I find it much easier to use the keyboard shortcuts. To Zoom In (magnify) press [Command-plus] (for Windows- [Control-plus]). To Zoom Out (scale down) press [Command-minus] (for Windows- [Control-minus]). I find it much easier to use the keyboard shortcuts. To Zoom In (magnify) press [Command-plus] (for Windows- [Control-plus]). To Zoom Out (scale down) press [Command-minus] (for Windows- [Control-minus]). |
|
|

 |
3.
I'm going to use the airbrush  first to get this speck on the boy's hair. I'll get into the airbrush's controls later. For this one, I just used a small brush to paint over the spot. To choose the right color you can sample a precise color from the image with the eyedropper tool first to get this speck on the boy's hair. I'll get into the airbrush's controls later. For this one, I just used a small brush to paint over the spot. To choose the right color you can sample a precise color from the image with the eyedropper tool  . To save time, just hold down the Option key (Windows= Alt key) while you're using any brush tool and magically your cursor change into the eyedropper. When I'm brushing, in order to mimic reality, I'll frequently sample a color, paint with it, sample another color, paint a few pixels with that one, and so on. Take a close look at how photos look at high magnification and try to imitate the pattern with your retouching. . To save time, just hold down the Option key (Windows= Alt key) while you're using any brush tool and magically your cursor change into the eyedropper. When I'm brushing, in order to mimic reality, I'll frequently sample a color, paint with it, sample another color, paint a few pixels with that one, and so on. Take a close look at how photos look at high magnification and try to imitate the pattern with your retouching.
You can see how the foreground color changed to the one I sampled; and below, the area after retouching. |
|
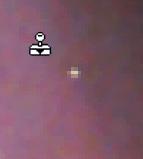
4.
On the boy's cheek,
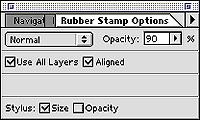
there's another annoying speck of dust or whatever. This time I'm going to use the rubber stamp tool  . This tool simply copies, or clones pixels from another part of the image you determine. It functions much like a painting tool, using the same brushes and having a similar Options box. Since I'm working on a separate layer to protect the original image from any errors I might commit while in an altered state of consciousness, I have to make sure the Use All Layers box is checked. I like to use as low an opacity level as possible. Just whatever's necessary to cover the blemish. If you do too much cloning at 100%, viewers of the image might start to see repetitions of the pixel patterns. To cover a spot, I might clone from two different areas at 50%, thereby covering the spot with a unique pixel arrangement. . This tool simply copies, or clones pixels from another part of the image you determine. It functions much like a painting tool, using the same brushes and having a similar Options box. Since I'm working on a separate layer to protect the original image from any errors I might commit while in an altered state of consciousness, I have to make sure the Use All Layers box is checked. I like to use as low an opacity level as possible. Just whatever's necessary to cover the blemish. If you do too much cloning at 100%, viewers of the image might start to see repetitions of the pixel patterns. To cover a spot, I might clone from two different areas at 50%, thereby covering the spot with a unique pixel arrangement.
You establish a source to clone from by positioning the tool at the location you want and holding down the Option key (Windows = Alt) and clicking. (Notice your cursor changes from a brush to the stamp tool when you hold down the key to define a source.) |
|
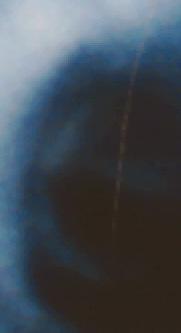
5.
Now I'm working on the hat. You can see that dark line I talked about running diagonally from the
upper left. There's also another scratch in the lower right corner I'll brush out.
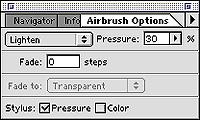
I'm back to using the airbrush and now we can look at its Options Palette. As I said above, I try to use a low opacity level if possible. While working on this image I rarely went above 30%.
Notice I've selected the Lighten Mode. The airbrush will look at the color information where you're painting. Pixels darker than the brush's color are replaced, and pixels lighter than the color do not change. While working on this image I switched pretty frequently between the Lighten, Darken, and Normal Modes. Darken is the opposite of lighten, believe it or not. It will only change the pixels that are lighter than your sampled color. Normal mode ignores color info and simple paints your sampled color, affecting all pixels where you paint. |
 |
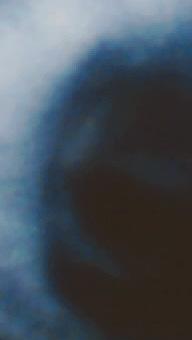
6.
In the image at the left, I've turned off the underlying layers, including the image, so that you
can see what some of the brushing looks like on the hat area we saw above. I used little spurts of
airbrushing so as to put just enough paint necessary to cover the imperfections. Airbrushing will
look like ... well, airbrushing. So you don't want too much of it. You can see in the image below
it (where all layers are visible again) that the hat has been fixed. |
 |
7.
Now let's fix the wound on the doggie. I used the airbrush Lighten Mode in when I was working at the top of the scratch and painting with colors sampled from the dog's "white" fur. Down lower, on the dark nose I painted in the Darken Mode (because the scratch was lighter than the nose, and I didn't want to unnecessarily paint any of the nose.)
You can see in the bottom image how this area turned out. |
 |
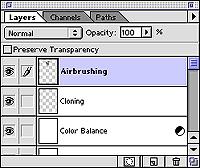
8.
Well, all that brush really took a while and you just got to see the highlights. You can see the
top of my Layers palette to the left. Remember, when you're altering an image it's best to do so on
a separate layer. That way, you can easily return to the original state if needed. I'll merge my
cloning and airbrushing layers together after I do one last thing. Airbrushing has a very soft,
blurry look to it and at times it will stand out. We want to fool everyone into thinking no
retouching has been done to the image so to make the brushing look more like the image's natural
pixels I'll apply a filter.
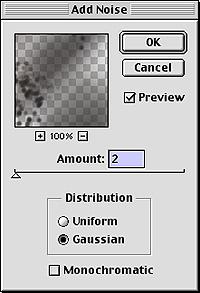
Filter: Noise: Add Noise... alters pixels by introducing randomly distributed color levels. The area looks less smooth. There's a slider box to control how much noise you put in. I did the least possible amount. Like any alteration to the image, I don't want my work to show. |
 |
9.
Well, this step took a bit more skill and an eye for detail than simply applying the Dust & Scratches... filter. These skills will come with practice. I'm always finding evidence of retouching in magazine advertisements. Start seeing if you can spot things that don't look quite right and you'll develop a discriminating eye. Your Photoshop work will improve as you become more visually critical. The differences between the two images to the left (the bottom one is the newest) will be very hard to notice at this size, but look closely. I painted a little more highlight on the brim of the hat, got rid of a blade of grass that was on the dog's back, and did some airbrushing on the boy's complexion, among other things.
Almost done. I've got one more mile of retouching to go before I sleep. I'm going to change the background of this image to suit my twisted compositional desires. Don't miss it! Be there as we experience:
Retouching & Color Correcting 7: The Final Nightmare |
|
|
Latest Forums Clone YourselfThat is quit nice. But I think that can be more easy to do.. |
|
|
