Reviews, updates and in depth guides to your favourite mobile games - AppGamer.com
|
Tutorials
Retouching a photo. Step 2: Using a curves adjustment.
Oct 18th 2005
|
Retouching & Color Correcting 2: Adjusting Curves:
|

|
1.
In the first step of this
tutorial,
Retouching & Color Correcting1: Adjusting Levels
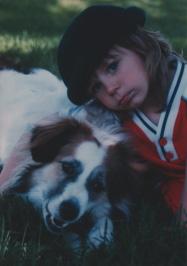
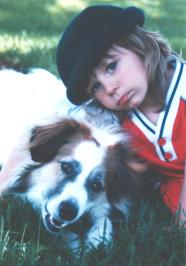
I used the levels command to adjust the value range of a bad scan and turn the muddy image at the upper left to the much nicer one you see below it.
Now I'll use the Image: Adjust: Curves... command to tweak the brightness and contrast a little further. I won't take long, but we'll spend a little time getting to know the Curves Dialog Box better.
|
|
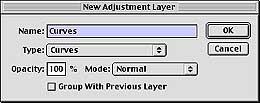
2.
As before I'll be using Photoshop's
Adjustment Layer function for my work here. Remember this feature lets you make adjustments to you image without potentially harming the original. If you're happy when all is done, you can flatten the image if you want.
Choose Layer: New: Adjustment Layer
You get the chance to name it if you wish (but how can I improve on the amazingly descriptive default name?) and you choose the type of adjustment layer you want.
Click OK |
|
|
 |
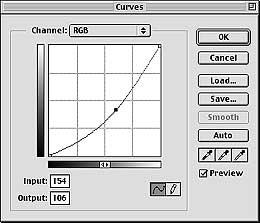
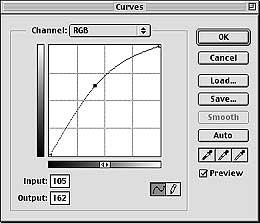
3.
When the Curves Dialog Box first pops up, you'll see a straight diagonal line running from lower left to upper right. This is placed in front of a 4 x 4 square grid. What you see represents the image "curve" as it exists. Changes in position of the lower left will affect the dark values in your image (for example, clicking the bottom left point and dragging it straight up along the left edge would lighten all your shadows). If you move the point in the upper right, the lightest values in your image will be affected (for example, clicking the top right point and dragging it straight down along the right edge would darken all your highlights).
Any changes to the center of the curve will affect the middle values most. Here (in the images to the left) I dragged the center of the line down and to the right slightly. This served to darken my image considerably. |
 |
4.
Here I clicked on the center of the line and
dragged up and to the left. Now the values in my
image are noticeably lighter and there's a little
more contrast.
|

|
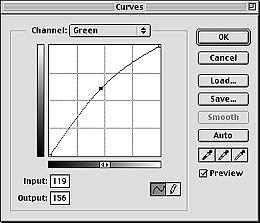
5.
If you click on the Channel: pop-up menu, and you have a multi-channel image open (such as RGB (3 channels)or CMYK (4 channels); a grayscale image only has 1 channel (black)), you can make adjustments to individual channels. Here I selected Green and made a curve with angles up and to the left slightly. As you can see, my image is suddenly a lot more "green". Excuse me for a moment, I feel a little sick.
OK, all better now. So far we've found out you can change brightness, contrast, and color balance with the curves dialog box. But you can do all those things elsewhere, too. This is one of the great things about Photoshop. There are many ways to approach a problem. Each person you ask might have a slightly different solution. But it can also be intimidating and a bit confusing when you're beginning. Only lots of experience will help you decide on the simplest course of action. As with everything else in life, the more practice you have, the better you'll become. |
 |
6.
What makes the curves dialog box special for me is
the ability to "anchor" points of you curve, and make changes to selective areas. A lot of the changes I made in Step One: Adjusting Levels, I could have made here in curves, but I preferred to make a broad change to the whole image there and more subtle tweaks to 3 tonal ranges here: Highlights, Mid-tones, and Shadows.
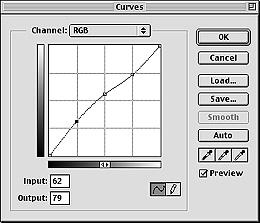
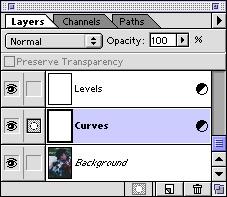
In the image to the upper left, I began by anchoring three points. All you have to do is click on the existing line. I clicked at the bottom corner of the top-right square (I want to anchor the lightest values in my image. They're fine in my opinion I don't need them lighter or darker). Next I clicked on the exact middle of the line and grid (this anchors the middle range of values- I want to make my darker values a little lighter without affecting the others). Finally I clicked on the top corner of the bottom-left square and dragged the curve up. With the two other positions anchored, only the darkest values are changed. In the middle to the left you can see the curve I finally ended up with. You can see that after playing around with it, I did end up lightening the middle values slightly by moving that point up. Now my layers palette (left) contains two adjustment layers. |
|
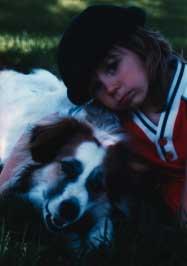
7.
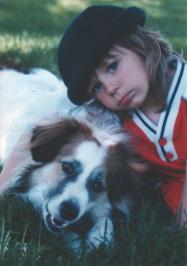
To the upper left is the finished images after
curve adjustments. Below it is the image as it was
before I started this step. After my subtle
adjustment (don't forget I'm working on a 5" x 7", 300ppi image), you can now see a nicer value range in the darkest areas. Take the hat for instance. It was much darker before. This served to flatten it out and now it has more shape and dimension.
I've still got work to do.
Next I'm going to use the Image: Adjust: Color Balance... command to make changes to the colors in my entire image. To continue along with me on our long and winding retouching road, proceed to
Retouching & Color Correcting 3: Adjusting Color Balance
There's much more you can do with curves. If you'd like to know lots more about making adjustment to curves, see my tutorial, Becoming Familiar With The Curves Dialog Box.
|
|
|
Latest Forums Clone YourselfThat is quit nice. But I think that can be more easy to do.. |
|
|
