Reviews, updates and in depth guides to your favourite mobile games - AppGamer.com
|
Tutorials
Retouching a photo. Step 1: Using Levels
Oct 18th 2005
|
Retouching & Color Correcting 1: Adjusting Levels:
|
 |
1.
When you scan images they frequently turn
out less than spectacular. At first you're all happy because you've got this cool photo you want to
use for your web site or whatever, but as soon as you see the truly crappy job your scanner did, your
mood darkens. Well, I'm going to turn that frown upside down, baby! But it's going to take several
stages.
This tutorial will be the first step towards color correcting and retouching a photo. I'll start out by making an adjustment to the levels. Levels of what? Value. The range of lights and darks in your image - from black though grays to white.
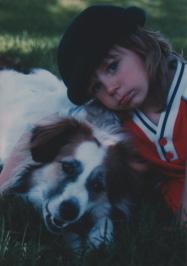
To the left I've got a small representation of the 300 dpi scan of a boy and his dog. Aren't they cute? Not yet. There's nowhere near enough contrast and everything looks muddy, as if this was taken on a dark and stormy day. Let's see what we can do.
|

 |
2.
Here's a step you can take or leave probably. Since I know what's coming up (I'll soon be setting the
black level for my image), I'm going to slightly alter my foreground color. I forget where I picked
this one up, or what the exact reasoning is, but I think the main goal is to not make the blacks in
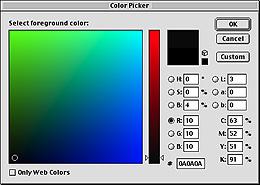
your image be "too black". Anyway, I click on the foreground color of black and up pops the color picker. I'm going to add just a little color to the black and the result will be very subtle. You can click somewhere near, but not right on, the lower left corner in the color window; or you can enter the RGB variables yourself as I did. I typed 10 in each box as you can see. Pick a low number. The higher the number you enter the "less black" your color will be. |
|
|
 |
3.
I'm going to use
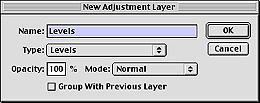
Photoshop's Adjustment Layer function for everything I do. This is a great feature that lets you do a bunch of work without potentially harming the original image. If you're happy when all is done, you can flatten the image if you want. Or, if further on down our long retouching road, I decide I was drunk when I did a certain step, I can get rid of the step in question.
Choose Layer: New: Adjustment Layer
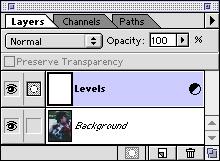
You get the chance to name it if you wish and choose the type. You can see what my layers Palette looks like now there to the left. |

 |
4.
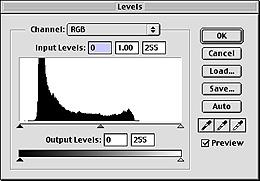
As soon as I click OK on the New Adjustment Layer Dialog Box you saw above, the Levels dialogue box makes its presence known. What exactly are all those spikes we're looking at? It's called a Histogram. (Mr. Rogers would make you repeat that word, I'm not going to ask that much of you.)
A histogram is a graphical representation of the range of values in your image. Typically, scanners will compress your value range resulting in the contrast problem I'm trying to correct. I'm going to set the black point first. This will establish what the darkest color in my photo will be. You can click on the black eyedropper tool  , and click on the darkest pixel you can see in your image to do this. What I'm going to do is click on my foreground color in the tool palette (remember that's the "near-black" color I made above. , and click on the darkest pixel you can see in your image to do this. What I'm going to do is click on my foreground color in the tool palette (remember that's the "near-black" color I made above.
Having done that, I now click on the white eyedropper tool  , and zoom my image way up and click on areas I think will be the lightest. Your foreground color changes as you do this so you can watch it to ensure you're getting the lightest color. That light gray you see in the middle image to the left is the best I could do and I found it in the dog's fur on the middle left side of the image. , and zoom my image way up and click on areas I think will be the lightest. Your foreground color changes as you do this so you can watch it to ensure you're getting the lightest color. That light gray you see in the middle image to the left is the best I could do and I found it in the dog's fur on the middle left side of the image.
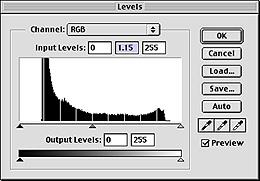
I don't often use the gray eyedropper tool , but feel free to try it and see the results. Once I set the white and black points, I've usually expanded the tonal range of my image sufficiently. Frequently if I feel the image needs more help I'll click on that middle triangle under the histogram, the gray slider. I'll move it slightly one way or the other until I'm happy. You can see what my Levels dialog looked like when I was done. I've succeeded in stretching out the value scale of my picture. |
 |
5.
Here's the before and after versions of my image. It looks considerably better but I've still got
work to do.
Next I'm going to use the Image: Adjust: Curves... command to finish what I began here and further refine the tonal range of my image.
Continue along with me and proceed to
Retouching & Color Correcting 2: Adjusting Curves |
|
|
Latest Forums Clone YourselfThat is quit nice. But I think that can be more easy to do.. |
|
|
