Reviews, updates and in depth guides to your favourite mobile games - AppGamer.com
|
Tutorials
Learn to make your own actions and save a ton of time.
Oct 18th 2005
|
Recording your own Actions with the Actions Palette:
|
|
1.
Shortly after Photoshop 5.0 came out, I was working for a retoucher in Chicago. We were both working
on projects, when he speaks up saying something to the effect of "Man, I'm just doing the same thing over and over." He was doing something like cropping and resizing over a hundred images.
I love moments like these. That's why Photoshop is a great program. It can anticipate certain needs you might have and then accommodate them. And yet it's so complex that even someone who uses it on a daily basis won't know all its features.
I went over and showed him how to use the Actions Palette. He was very grateful and he got the work done in about one-fourth the time.
Creating your own actions can save you a great deal of time. If you're doing work that requires any repeating series of commands, you'll want to use this feature that's been around since Photoshop 4.0. Some applications refer to this as recording a "macro." Whatever your terminology, you can record a series of acts and then replay them whenever you want.
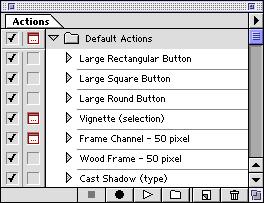
Your Actions palette (left) comes loaded with a bunch of Default Actions Photoshop thinks you might be able to use.
|
|
2.
For this tutorial I'm going to execute a series of commands to create a custom type style and then
apply it to other type by playing an action I create.
But keep in mind you can create actions for just about anything. I've created actions for copying; pasting; rotating and flattening selected areas of scanned images. I've made actions for adjusting brightness, contrast and color levels on a bunch of images. I use the action palette all the time. Once you know how to do it, you will too. |
|
|
|
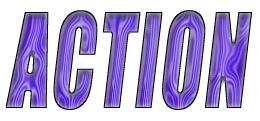
3.
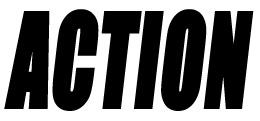
Because I'll be performing this action on several other layers of type, I do any layer-specific work
before I begin recording. Here I load a selection of the type I made and create a new layer for what
I'm going to do.
Actions you record are quite literal, so you've got to watch it in terms of things like saving during an action and creating & naming new layers. In this one, if I had included this step in my action, every time I played the action it would have kept loading the selection for the text layer "ACTION." |
|
4.
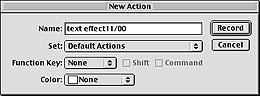
Down at the bottom of the Actions Palette are the controls you'll need. Record  will start recording, adding on to whatever Action is currently selected. Stop will start recording, adding on to whatever Action is currently selected. Stop  is what you hit whenever you're done recording of course. Play is what you hit whenever you're done recording of course. Play  will run whatever action you've currently selected. The one I need now is the New Action Button will run whatever action you've currently selected. The one I need now is the New Action Button  . To the left is the dialog box you get. Here you can give it a name, pick where it will reside on the palette, and create a keyboard shortcut if you want. After I type a name I click Record. . To the left is the dialog box you get. Here you can give it a name, pick where it will reside on the palette, and create a keyboard shortcut if you want. After I type a name I click Record. |
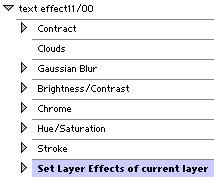 |
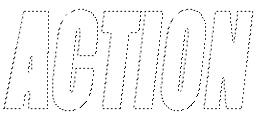
5.
Now while it's recording, I do all my work. After I'm done, the text looks as you see it to the left.
When I'm done I click Stop
On the bottom left you can see how the Actions Palette has recording and identified every significant thing I did.
That's it. In a lot of the steps I performed I had to make specific settings on slider bars for things like the blur amount, brightness level, and hue. All that is recorded. In the old days, if you wanted to duplicate an complex effect such as this, you'd have to take notes in order to do it later. This has come in handy for me in things like making buttons for a web site. I might go back a year later and want to add a new button to my menu, and all I have to do is play the action to make another one; rather than try to remember how I did it the first time. This leaves a lot of extra room in my brain for more important things such as the likes and dislikes of the Playmate of the Month. . |
 |
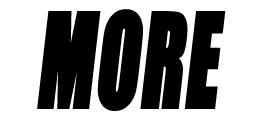
6.
Now it's time for the fun. Just sit back and watch as all you hard work pays off.
I create the word MORE on a text layer then load it's selection as I did with the other word earlier. I select the action I just created and hit Play .
Notice the arrow next to the title of the action. You click it to alternately hide/ show the individual acts the action contains. |
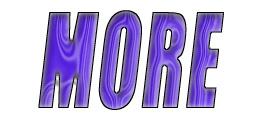 |
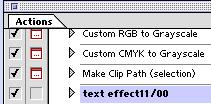
7.
Here's the result. It only took a matter of seconds to automatically do the effect it took me several
minutes to create manually.
|
 |
8.
Now you're ready to make your own. After you do that first one, you'll start realizing how frequently
this feature will come in handy. No more tedious, repetitious work for you! Happy Image
Editing!
|
|
|
Latest Forums Clone YourselfThat is quit nice. But I think that can be more easy to do.. |
|
|
