Creating Gel Text
Oct 18th 2005
|
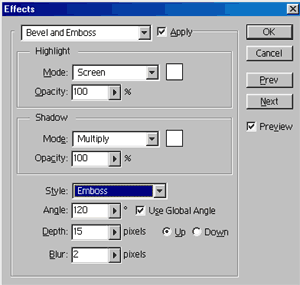
Gel Text the easy way:
|
|||||||||||||||
|
|||||||||||||||
 |
|
Reviews, updates and in depth guides to your favourite mobile games - AppGamer.com
|
|||||||||||||||||||
|
Tutorials
Creating Gel TextOct 18th 2005
|
Latest Forums Clone Yourself That is quit nice. But I think that can be more easy to do.. CS2 problem with selection tool I have the same problem. Not always but sometimes. I can n.. adobe photoshop brush download free All the brushes are nice which can download. But all link.. LCD Monitor: my first vector To make it more natural you can add shadow behind it. That.. WIP: Book Cover [125K] Really fantastic work. I like it. But you may make it more.. |
||||||||||||||||||
| © Web Media Network Limited. All rights reserved. No part of this website may be reproduced without written permission. Photoshop is a registered trademark of Adobe Inc.. TeamPhotoshop.com is not associated in any way with Adobe, nor is an offical Photoshop website. |