 |
1.
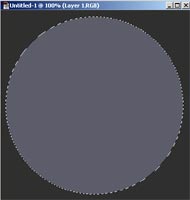
Start by creating a new image. For this tutorial I made
a new 400x400 image with a gray background (RGB 47,47,46).
Next click on the create new layer tab  to make a new layer above your gray background layer. Next grab your elliptical marquee tool and make a selection similar to the one I have made ( make sure you are on your new layer and not the background layer ). Also, you can hold down your shift key while making the selection to make a perfect circle which is what we want. Once you have your selection ready fill it using the paint bucket tool. Make sure you fill it with a different color than the background so you can see it. I am using an RGB of 92,93,106. For the first time running through this tutorial I would suggest you use the same. You will see why later :) to make a new layer above your gray background layer. Next grab your elliptical marquee tool and make a selection similar to the one I have made ( make sure you are on your new layer and not the background layer ). Also, you can hold down your shift key while making the selection to make a perfect circle which is what we want. Once you have your selection ready fill it using the paint bucket tool. Make sure you fill it with a different color than the background so you can see it. I am using an RGB of 92,93,106. For the first time running through this tutorial I would suggest you use the same. You will see why later :) |
|
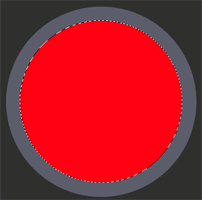
2.
Now hit Ctrl+D to deselect the layer. Create a new layer above the one you just made. This time follow the same steps as above only make this circle smaller than your first layer's circle. When you have this one done fill it again but make sure you use the gray color so you can see it. I used red so you can see about how big to make your new circle. Once you have the new circle created and filled you will need to center everything so it is perfectly centered on your background and also deselect the selection. If your not sure how to do this there is a trick you can see here. If you are using an older version of Photoshop you will have to do it the old fashioned way and just use your eyes. |
|
|
|

|
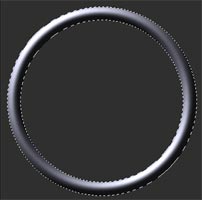
3.
Once the layers are all aligned perfectly in the center you
now need to Ctrl+Click on the top layer to activate the selection
(the red one in the picture above). Once the selection is
active you need to hit your delete key (Don't deselect yet).
Now with the selection still active click on the layer below
(it should turn blue so you know you are now working in that
particular layer). Hit your delete key once again on this
layer and now you should have your basic ring. Hit Ctrl+D
to deselect if you have not done so yet. You can also delete
the empty layer (the top layer) now. You should now be down
to only the two layers. The background and the ring. Name
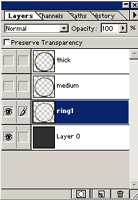
the layer with the ring, ring1. Ctrl+Click on layer "ring1" to select it. |

|
4.
With the layer selected click on your channels tab and click
on the "save selection as channel" button. It should be the second one going left to right at the bottom of your channels window. You should now see a new channel and by default it should be called Alpha 1. Click on this channel and then drag it into the "create new channel" button to duplicate it. This channel should be called Alpha 2 by default. Rename this channel to bevel. Once you have renamed the channel to bevel go to Filter/Blur/Guassian Blur and choose a value of 8. Then Guassian Blur it again with a value of 5, and one more time with a value of 1. Now hit Ctrl+Shift+I to invert the selection. Hit your delete key to get rid of any unwanted jaggies. Hit Ctrl+D to deselect the bevel channel. You should have a nice smooth ring now. |
 |
5.
Now in your channels window Ctrl+Click the Alpha 1 layer to
select it. Once you have it selected go back into your layers
palette and click on the ring1 layer (Make sure it is still
selected). Now go to Filter/Render/Lighting Effects. Use the
default setting with the rest of the settings as follows.
Light Type- Directional. I have it coming from the top left area
Negative= 35
Gloss= 67
Material= 69
Exposure= 0
Ambience= 8
Height= 50
And most important make sure your texture channel is the "bevel" channel |
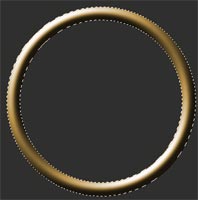 |
6.
Now if yours is like mine and the lighting effects made the
color look a bit on the rough side drag your layer into the
create new layer tab to duplicate this layer. Once you have
your new layer (it should be called ring1 copy) go to Filter/Blur/Guassian
Blur and choose a value of around 2. Once you have it nice
and smooth again hit Ctrl+E to merge the smooth layer with
the original ring1 layer. Now you should be back to only two
layers (the background layer and ring1). Lets give our ring
a nice color now so go to Image/Adjust/Hue-Saturation. Place
a check in the colorize box and I used the settings of
Hue= 40
Saturation= 43
Lightness= 0 |
 |
7.
Now we need two more rings so drag your ring1 layer into the
create new layer tab twice to duplicate it. You should now
have a total of three rings. Name the very top ring thick,
the second ring down medium, and your ring1 layer should be
on the bottom just above your background. If you have not
done so yet hit Ctrl+D to deselect everything. Go into your
channels tab and Ctrl+Click Alpha 1 to get a clean selection
again. Go back into your layers palette. Go up to the layer
named thick and hide it (to hide it click on the eye in that
layer) Now click on your medium layer. Go to Select/Modify/Contract
and use a value of 3. Hit Ctrl+Shift+I to invert the selection
and hit delete. Hit Ctrl+Shift+I again to get the ring selected
again. Hide the medium layer and with the ring still selected
click on the ring1 layer. Go to Select/Modify/Contract and
use a value of 2 this time. Hit Ctrl+Shift+I to invert the
selection and hit delete. Now hit Ctrl+D to deselect the ring
and you should now have three rings with the thinnest on the
bottom, a medium one in the middle and the thick one on top. |
 |
8.
While you are still in the ring1 layer go to Image/Adjust/Brightness-Contrast
and choose a value of
Brightness= -25
Contrast= +10
Click on the medium layer and go to Image/Adjust/Brightness-Contrast and choose a value of
Brightness= -15
Contrast= 0
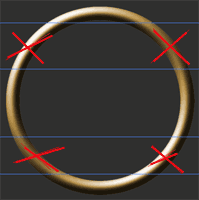
Now go ahead and make all your ring layers visible again by clicking on the closed eye. Once they are all visible click on the thick layer. Go to View/Show Ruler and then go to View/Show guides. We want to be somewhat uniformed so place guides where you want your rings to show through. The areas with the red x's are going to be the areas that we erase. |
 |
9.
Now while still in your thick layer grab your eraser tool
and choose a large solid brush to erase with. We will be erasing
inside the blue guides in the red x area for this tutorial.
So erase away carefully all of the areas we marked off with
our guides. This should be exposing the medium ring below
as we are erasing. Make your ends somewhat on an angle. You
probably don't want to go straight across where the guides
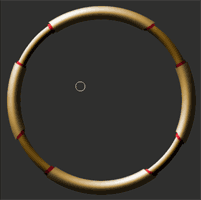
are. Just use them as a reference. I changed the color of
my thick layer so you could get an idea of where I cut my
ring. The red area is what is left after I erased away part
of the ring. |
 |
10.
Once you have your thick ring erased to how you like it click
on your medium layer. Now we will be using the same technique
here as above. But, we want to leave a little bit of an edge
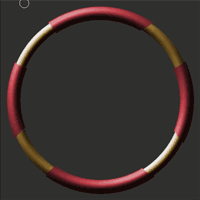
showing right under the thick ring above. I changed the color
of the medium layer to red so you could see what I mean. You
want to leave just a little area under under each section
of the thick ring. Once again as you erase, the ring1 layer
should be showing through underneath so you can see where
you are at. |
 |
11.
When you have your medium layer erased away to how you like
it go to Layer/Effects/Outer Glow and use the settings of
Mode- Normal
Change the color to "Black"
Opacity to 100%
Blur to 2
Intensity to 100
Now you should have some nice shadow effects on your medium layer. Play around with different settings until you get it how you like it. You can also go to the Image/Adjust/Brightness-Contrast and darken it up a bit now that you can see all the rings and how they look together. Or, use the burn tool.
|
 |
12.
Now go back to your thick layer by clicking it. Make sure
your colors are set to foreground-Black and Background-The
purple"ish" color we used in step one of this tutorial.

Remember I told you to use that particular color, well now is why we needed it :) Drag the thick layer into the create new layer tab to duplicate it. Once it is duplicated hide it and go back to the original thick layer. Go to Filter/Sketch/Reticulation. Place "all" the settings to zero and run it. Hmmm, pretty neat. It kind of gives it a nice rubbery look. We could stop here but lets go on. |
 |
13.
Go up to the thick layer copy and click it to activate that
layer. Go to the Filter/Sketch/Reticulation and run it again.
Only this time use the settings of
Density= 5
Black Level= 0
White Level= 0
Now we have a nice texture to play with. Now change the layer mode to soft light and change the opacity to 75%. Now we have that nice rubbery look but with some texture to it. You can now hit Ctrl+E to merge the two thick layers into one single layer. Once again play around with the settings and layer modes to get the effect you like. Now just add a drop shadow to the ring1 layer and your off. You will sometimes notice some unwanted white pixels around the edges of the thick layers. You will need to go and erase those by hand or you can Ctrl+Click the thick layer. Contract the selection by one pixel, invert the selection and hit delete. That usually does the trick. |
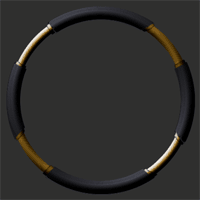
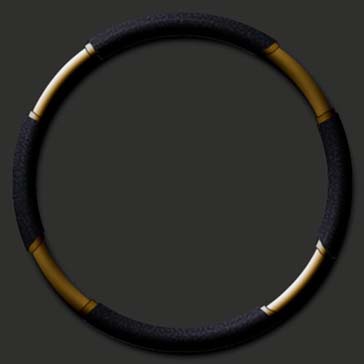
Here is one I did and I used the eraser tool on the thick layer to give it a wrapped look. Then I just added some highlights to the inside of the cutout areas
 |
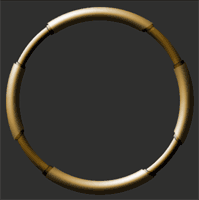
Here is the original one from the tutorial that we just completed. To get rid of the white jaggies I used the contract by one pixel and delete method.
 |
